Boat fenders are essential for protecting your vessel from damage while docking. Properly inflating and deflating them ensures they function effectively and last longer. Follow this step-by-step guide to inflate and deflate your boat fenders correctly.
Inflating Boat Fenders (Image from Left to Right)
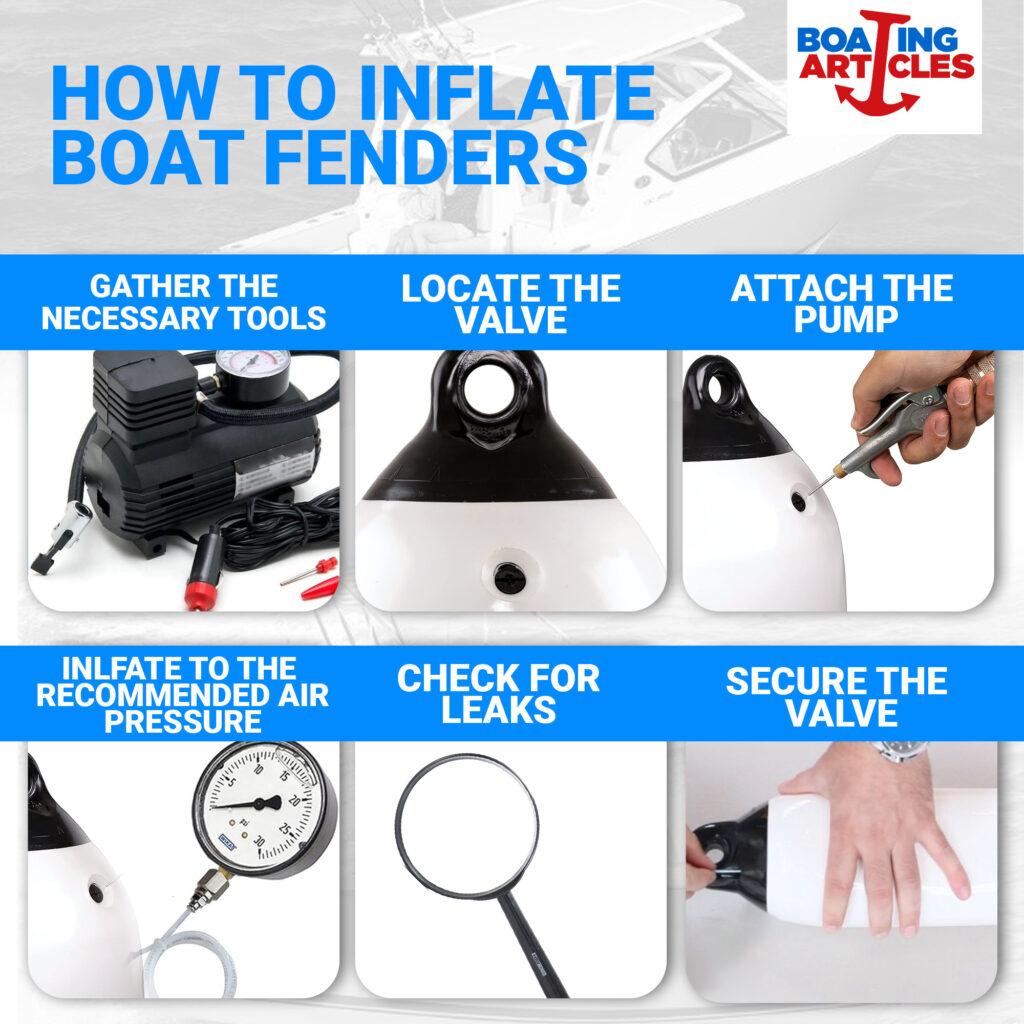
Step 1: Have a Compatible Air Pump
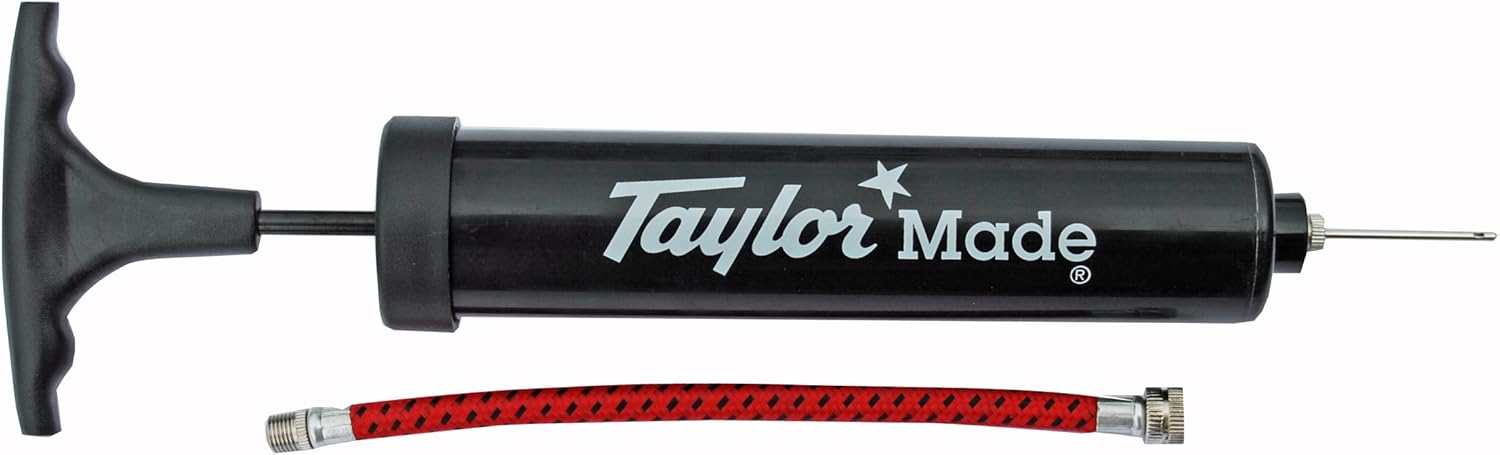
Prepare all tools including a compatible boat fender air pump that can be either manual or electric. It’s really a matter of preference. If you only inflate fenders occasionally and have small to medium-sized fenders, go for a Manual Pump. However, if you inflate large fenders frequently, for your convenience, choose an Electric Pump.
Manual vs. Electric Air Pump for Boat Fenders
Manual Air Pump
✅ Pros:
- Portable and doesn’t require power.
- Less expensive.
- Good for occasional inflation needs.
- Works well for small or medium-sized fenders.
❌ Cons:
- Requires physical effort.
- Takes longer to inflate larger fenders.
- Can be tiring if inflating multiple fenders.
🔹 Common Types:
- Hand Pump – Small, lightweight, good for quick top-ups.
- Foot Pump – More efficient than a hand pump, requires less arm effort.
Electric Air Pump
✅ Pros:
- Fast and effortless inflation.
- Ideal for inflating multiple or large fenders.
- Some models have adjustable pressure settings.
❌ Cons:
- Requires power (battery-operated or plug-in).
- More expensive than manual pumps.
- Bulkier and less portable.
🔹 Common Types:
- 12V DC Pump – Plugs into a boat or car power outlet (cigarette lighter).
- Rechargeable Battery Pump – Cordless and portable.
- AC Electric Pump – High-power but requires an electrical outlet.
Aside from the boat fender air pump, make sure you also have:
- A needle valve adapter (if required by the manufacturer)
- A pressure gauge
- Soapy water (for leak detection)
Step 2: Find the Valve on the Fender
Most boat fenders have a built-in valve, which may be a screw-type or a push-in type. Check the manufacturer’s instructions if unsure.
Types of Boat Fender Valves & How to Identify Yours
Different types of boat fender also come with different types of valves, which determine how you inflate or deflate them. Here are the most common types:
Needle Valve (Sports Ball-Type)
🔹 Description:
- Looks like the valve on a basketball or soccer ball.
- Requires a standard ball inflation needle to inflate or deflate.
🔹 How to Identify:
- Small hole in the valve stem.
- Usually recessed inside the fender.
- Pressing the center pin releases air.
🔹 Common Brands:
- Polyform, Taylor Made
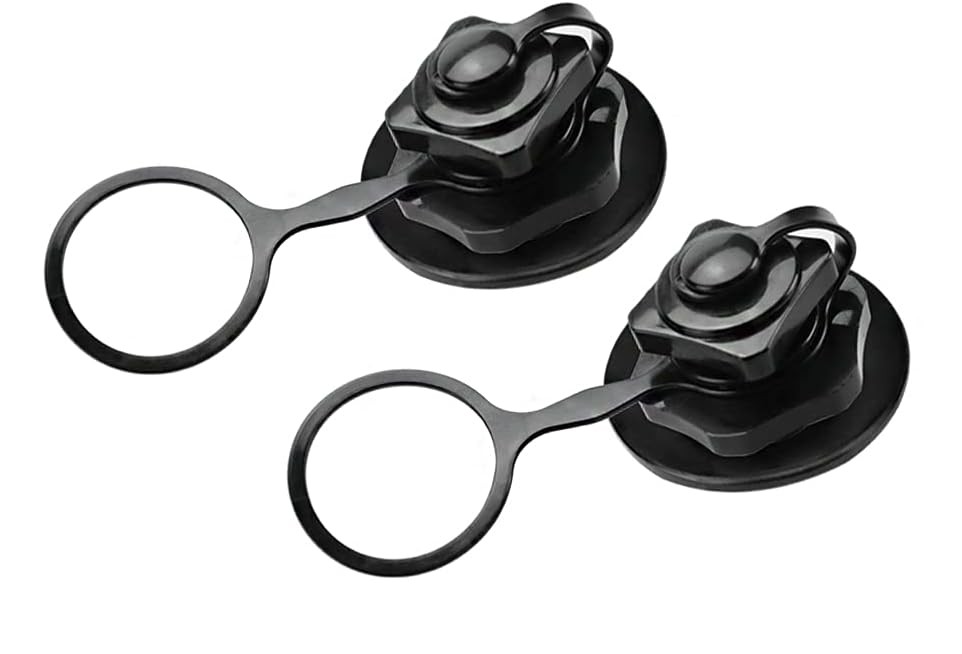
Screw-In Valve (Threaded Cap)
🔹 Description:
- Has a screw-in cap that covers the air valve.
- Air is pumped in after removing the cap.
- Some have a one-way check valve to prevent air loss.
🔹 How to Identify:
- Clearly visible screw cap.
- May have a plastic or metal body.
- No central pin like a needle valve.
🔹 Common Brands:
- Dan-Fender, Majoni
Push-Pin Valve (One-Way Check Valve)
🔹 Description:
- Has a small rubber or plastic pin inside.
- Push to release air or insert a pump nozzle to inflate.
- Self-sealing to prevent air escape.
🔹 How to Identify:
- Small flexible pin in the center.
- Pressing lightly lets out a small burst of air.
🔹 Common Brands:
- Some Polyform and other premium brands
Boston Valve (Two-Way Valve)
🔹 Description:
- A two-piece valve commonly found in inflatable boats and larger fenders.
- One-way air intake prevents air from escaping while inflating.
- Has a separate deflation mode.
🔹 How to Identify:
- Large, round plastic valve with an inner and outer cap.
- Inner cap allows air in but not out; outer cap is removed for deflation.
🔹 Common Brands:
- Seen in larger or specialty fenders.
Step 3: Use the Appropriate Adapter
Connect the air pump to the fender’s valve using the appropriate adapter. Ensure a secure fit to prevent air leaks. To find the right adapter for your boat fender valve, follow these pointers based on the type of valve you have:
Needle Valve (Sports Ball-Type)
✅ Adapter Needed: Standard ball inflation needle (like for basketballs/soccer balls).
🔹 Where to Find It: Any sporting goods store, Amazon, or marine supply shops.
🔹 Example:
- Adapter Name: “Inflation Needle for Sports Balls”
- Compatible Pumps: Hand pumps, foot pumps, and electric pumps with a needle attachment.
🔹 Alternative: If your fender valve is recessed, you may need a longer inflation needle.
Screw-In Valve (Threaded Cap)
✅ Adapter Needed: Specific screw-in valve adapter (varies by brand).
🔹 Where to Find It: Marine supply stores or online (look for your fender’s brand).
🔹 Example Brands & Adapters:
- Polyform Fender Valve Adapter – Fits Polyform fenders.
- Taylor Made Fender Pump Adapter – Designed for Taylor Made fenders.
🔹 Alternative: Some screw-in valves work with a standard tapered nozzle from air compressors.
Push-Pin Valve (One-Way Check Valve)
✅ Adapter Needed: A cone-shaped or tapered nozzle that can push the pin.
🔹 Where to Find It: Universal air pump kits, marine stores.
🔹 Example:
- Universal Tapered Inflator Nozzle – Works with many push-pin valves.
- Hand Pump with Tapered Nozzle – Often included in boat fender pump kits.
🔹 Alternative: If the pin isn’t being pressed down enough, try wrapping a small rubber band around the nozzle tip for a tighter fit.
Boston Valve (Two-Way Valve)
✅ Adapter Needed: Boston Valve adapter (specific size required).
🔹 Where to Find It: Marine supply stores, inflatable boat accessory shops.
🔹 Example:
- Boston Valve Inflation Adapter Set – Comes with multiple sizes.
- Electric Pump with Boston Valve Adapter – If using an electric pump, ensure it includes this attachment.
Step 4: Pump Air Into the Fender While Monitoring the Pressure with Gauge
Pump air into the fender while monitoring the pressure with a gauge. Most fenders require an inflation pressure between 1.5 and 2.5 PSI. Avoid overinflating, as excessive pressure can cause fender deformation or bursting. Here are ways to know if your boat fender is at a recommended pressure.
The Squeeze Test (Quick & Easy Method)
✅ Steps:
- Press the side of the fender with your thumb.
- It should be firm but slightly soft—not rock hard or too squishy.
- If it feels too rigid, it may be overinflated; if it compresses too easily, it needs more air.
🔹 Best for: Quick checks when you don’t have a pressure gauge.
Using a Pressure Gauge (Most Accurate Method)
✅ Steps:
- Use a low-pressure air gauge (1-10 PSI range).
- Insert it into the valve (some fender pumps come with built-in gauges).
- If it’s below 1 PSI, add air; if it’s above 2 PSI, release some.
🔹 Best for: Ensuring precise pressure.
🛠 Recommended Gauges:
- Polyform Air Pressure Gauge
- Digital low-pressure tire gauge
Visual Inspection (Check for Overinflation or Underinflation)
🔹 Signs of Overinflation:
- Fender feels rock-hard and has no give.
- Valve area may bulge slightly.
- Could be at risk of bursting in extreme heat.
🔹 Signs of Underinflation:
- Fender collapses too easily when pressed.
- Less effective at absorbing impact.
- May not stay in position properly.
Manufacturer Recommendations
- Some fenders (like Polyform and Taylor Made) specify ideal PSI.
- Check the fender’s manual or brand website for specific guidance.
How Often Should You Check for Pressure?
✔ Before long trips or docking in rough conditions.
✔ Every few weeks if left outside, as temperature changes can affect air pressure.
✔ After winter storage, since fenders may lose air over time.
Step 5: Check for Leaks
If you suspect your boat fender has a slow leak, here are the best ways to test it:
The Squeeze & Listen Test (Quick Check)
✅ Steps:
- Firmly squeeze the fender.
- Hold it close to your ear and listen for a hissing sound.
- If you hear air escaping, there’s a leak.
🔹 Best for: Detecting large leaks quickly.
The Soapy Water Test (Most Reliable Method)
✅ Steps:
- Mix dish soap with water in a spray bottle or bucket.
- Inflate the fender to normal pressure.
- Spray or wipe the soapy water over the entire surface, especially around the valve and seams.
- Watch for small bubbles forming, which indicate air escaping.
🔹 Best for: Finding small leaks, especially around seams and valves.
Submersion Test (For Small Fenders Only)
✅ Steps:
- Fully inflate the fender.
- Submerge it in a large tub of water.
- Watch for air bubbles escaping, which indicate the leak’s location.
🔹 Best for: Small fenders that fit in a tub of water.
🔹 Not ideal for: Large fenders (use the soapy water test instead).
The Overnight Pressure Test
✅ Steps:
- Inflate the fender to normal pressure.
- Leave it overnight in a dry, cool place.
- Check if it has softened or deflated by morning.
🔹 Best for: Detecting slow leaks.
Check the Valve (Common Leak Point)
✅ Steps:
- Apply soapy water around the valve stem and check for bubbles.
- If leaking, try tightening or replacing the valve insert (some brands have removable valves).
- If the valve is loose, apply a small amount of silicone grease to help seal it.
How to Fix a Leaking Fender
🔧 Small Leaks: Use vinyl repair patches or marine-grade adhesive (like 3M 5200).
🔧 Leaky Valve: Replace the valve if it’s removable or use a sealant.
🔧 Large Cracks or Seam Damage: Consider replacing the fender, as repairs may not last.
Step 6: Secure the Valve
Once properly inflated, close the valve tightly to prevent air loss. Some valves have a cap that should be screwed on securely. Ensuring your boat fender valve is properly secured helps maintain air pressure and prevents leaks. Here’s how to do it based on the valve type:
Needle Valve (Sports Ball-Type)
✅ Steps:
- Ensure the inflation needle is inserted straight to avoid damaging the valve.
- Remove the needle carefully after inflating.
- If the valve is leaking, apply a small drop of silicone grease on the needle before inserting it to help seal the valve.
- Press the valve lightly to check for any air escaping.
Screw-In Valve (Threaded Cap)
✅ Steps:
- After inflating, screw the valve cap on tightly but do not overtighten (this can damage threads).
- If the valve leaks, remove it and check for dirt or damage on the threads.
- Apply Teflon tape or a rubber O-ring for a tighter seal if needed.
- If the valve is removable, replace it with a compatible one from the same brand.
Push-Pin Valve (One-Way Check Valve)
✅ Steps:
- Ensure the pump nozzle fits snugly to fully depress the pin while inflating.
- After removing the pump, press the pin lightly to ensure it has sealed itself back up.
- If air is escaping, try pushing the pin gently to help it reset.
- For persistent leaks, apply a small amount of silicone lubricant to the pin or replace the valve if possible.
Boston Valve (Two-Way Valve)
✅ Steps:
- Ensure the inner cap is tightly screwed in before inflating.
- After inflation, replace the outer cap and secure it tightly.
- If air is leaking, check the valve for cracks or dirt.
- Apply Teflon tape around the threads if the seal is weak.
Deflating Boat Fenders (Image from Left to Right)
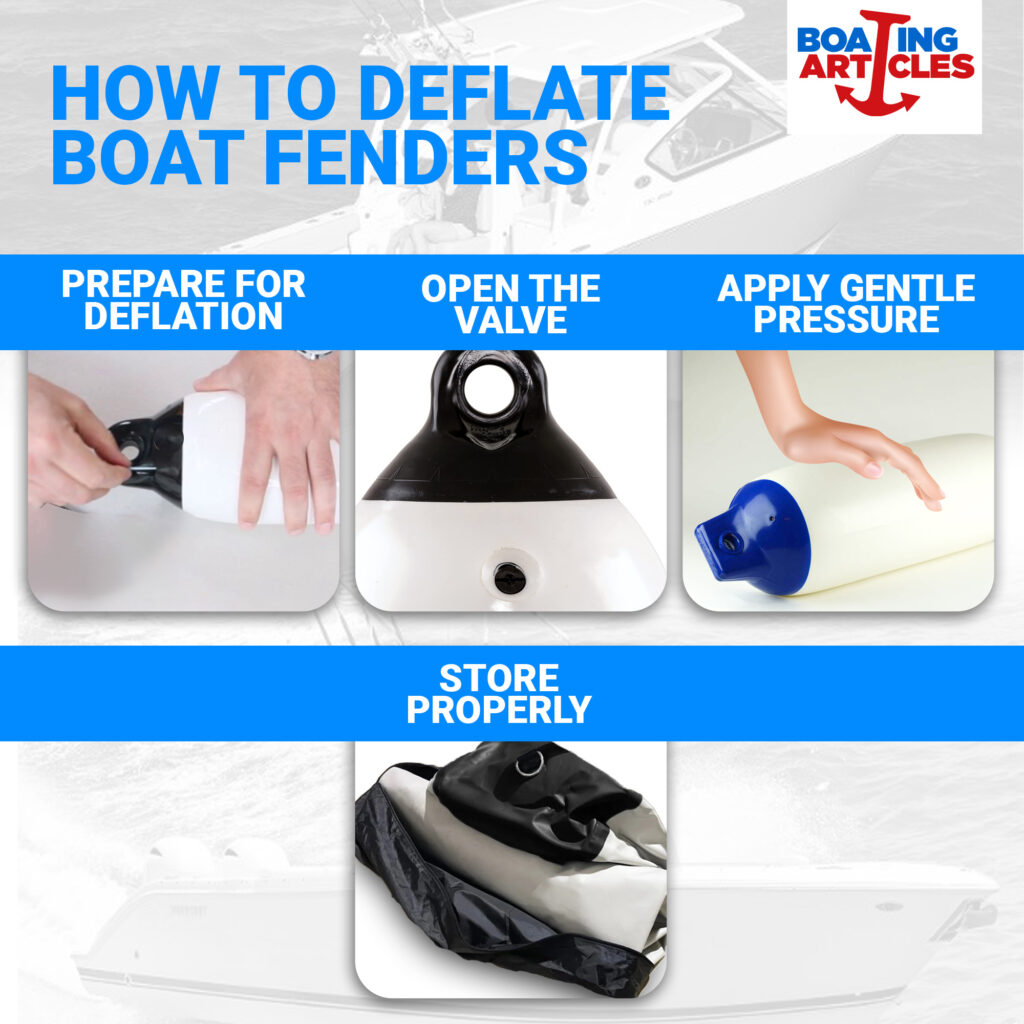
Step 1: Prepare for Deflation
Ensure the fender is clean and dry before deflating. Place it on a flat surface to make the process easier.
Step 2: Open the Valve
Unscrew or depress the valve to release air. Some fenders require a tool or adapter to push the valve open.
Step 3: Apply Gentle Pressure
Gently press or roll the fender to expel air more efficiently. Be careful not to damage the valve while doing this.
Step 4: Store Properly
Once fully deflated, fold the fender neatly and store it in a dry, cool place. Avoid direct sunlight or exposure to harsh elements that could degrade the material.
Additional Tips for Boat Fender Maintenance (Image from Top to Bottom)

Ways to Protect Boat Fenders Against Wear and Tear
- Fender Covers: Use soft fabric or neoprene covers to reduce UV exposure and scuffing.
- Regular Cleaning: Wash with soap and water to prevent dirt buildup, which can degrade the material.
- Avoid Overexposure to Sun: UV rays weaken plastic/rubber materials over time; store fenders when not in use.
- Check for Sharp Edges: Ensure the fenders aren’t rubbing against jagged dock edges or rough boat surfaces.
- Proper Positioning: Adjust fender height and placement to prevent excessive movement or dragging in the water.
- Rotate Usage: If you have multiple fenders, rotate them to distribute wear evenly.
How Long Do Boat Fenders Last?
- Lifespan: Typically 3-10 years, depending on usage, exposure to elements, and maintenance.
- Signs of Wear:
- Cracks, brittleness, or fading from UV damage.
- Slow air leaks or difficulty holding air pressure.
- Thinning material in areas that frequently rub against docks or other boats.
With proper care and storage, fenders can last on the higher end of this range.
Conclusion
By following these steps, you can ensure your boat fenders remain in optimal condition, providing maximum protection for your vessel. Proper inflation and deflation not only improve performance but also extend the durability of your fenders.