Getting your bilge pump wiring right is a critical safety job on any boat. This circuit is your first line of defense against taking on water. It connects your pump to the battery, with a switch for control and a fuse for protection.
When done correctly, you have a reliable system ready when you need it most.
Your Essential Bilge Pump Wiring Blueprint
Before you start, understand what makes a bilge pump circuit reliable. At its core, you're creating a dedicated, protected electrical path. In the harsh marine environment, every connection and component choice matters.
If you're new to this, review the fundamental principles of electrical wiring to get your bearings.
A standard setup has a few key players:
- The Bilge Pump: This is the workhorse, moving water out of your boat.
- The Power Source: This is typically your boat's 12V or 24V battery.
- The Fuse: This is a non-negotiable safety net that prevents a potential fire.
- The Switch: This gives you control to run the pump manually or automatically.
The global bilge pumps market hit USD 3.67 billion in 2024 and is on track to reach USD 5.33 billion by 2030. This boom is driven by boaters demanding more reliable water removal systems.
Key Takeaway: The gold standard is a pump that kicks on automatically when needed but also lets you flip a switch to run it manually. This dual-mode capability provides real peace of mind.
Manual vs Automatic Bilge Pump Wiring Setups
Your wiring depends on whether you want a manual or automatic system. The difference is adding a float switch and using a three-way panel switch. I recommend the three-way switch for nearly every boat owner.
| Feature | Manual Switch System | Automatic Float Switch System |
|---|---|---|
| Primary Component | A simple two-way (ON/OFF) switch. | A three-way (ON-OFF-AUTO) switch paired with a float switch. |
| Complexity | Very simple. Power goes from the battery, through a fuse, to the switch, and then to the pump. | Slightly more complex, with an extra wire running to the float switch for the "AUTO" function. |
| Use Case | Best for small, open boats like dinghies where you can always see the water level. | The standard for virtually all other boats. It works when you're on board and, more importantly, when you're not. |
| Reliability | Only as reliable as you are. You must be present to turn it on. | Far more reliable. It protects your boat 24/7, turning on automatically if water gets in. |
Ultimately, the automatic setup offers superior protection. While a manual switch is better than nothing, a float switch is what you want.
A basic manual switch requires you to be present to activate it. A far better setup uses a three-way (ON-OFF-AUTO) switch with a float switch. To learn more, see our guide on how bilge pumps work and why you need one.
Getting Your Tools and Materials Ready
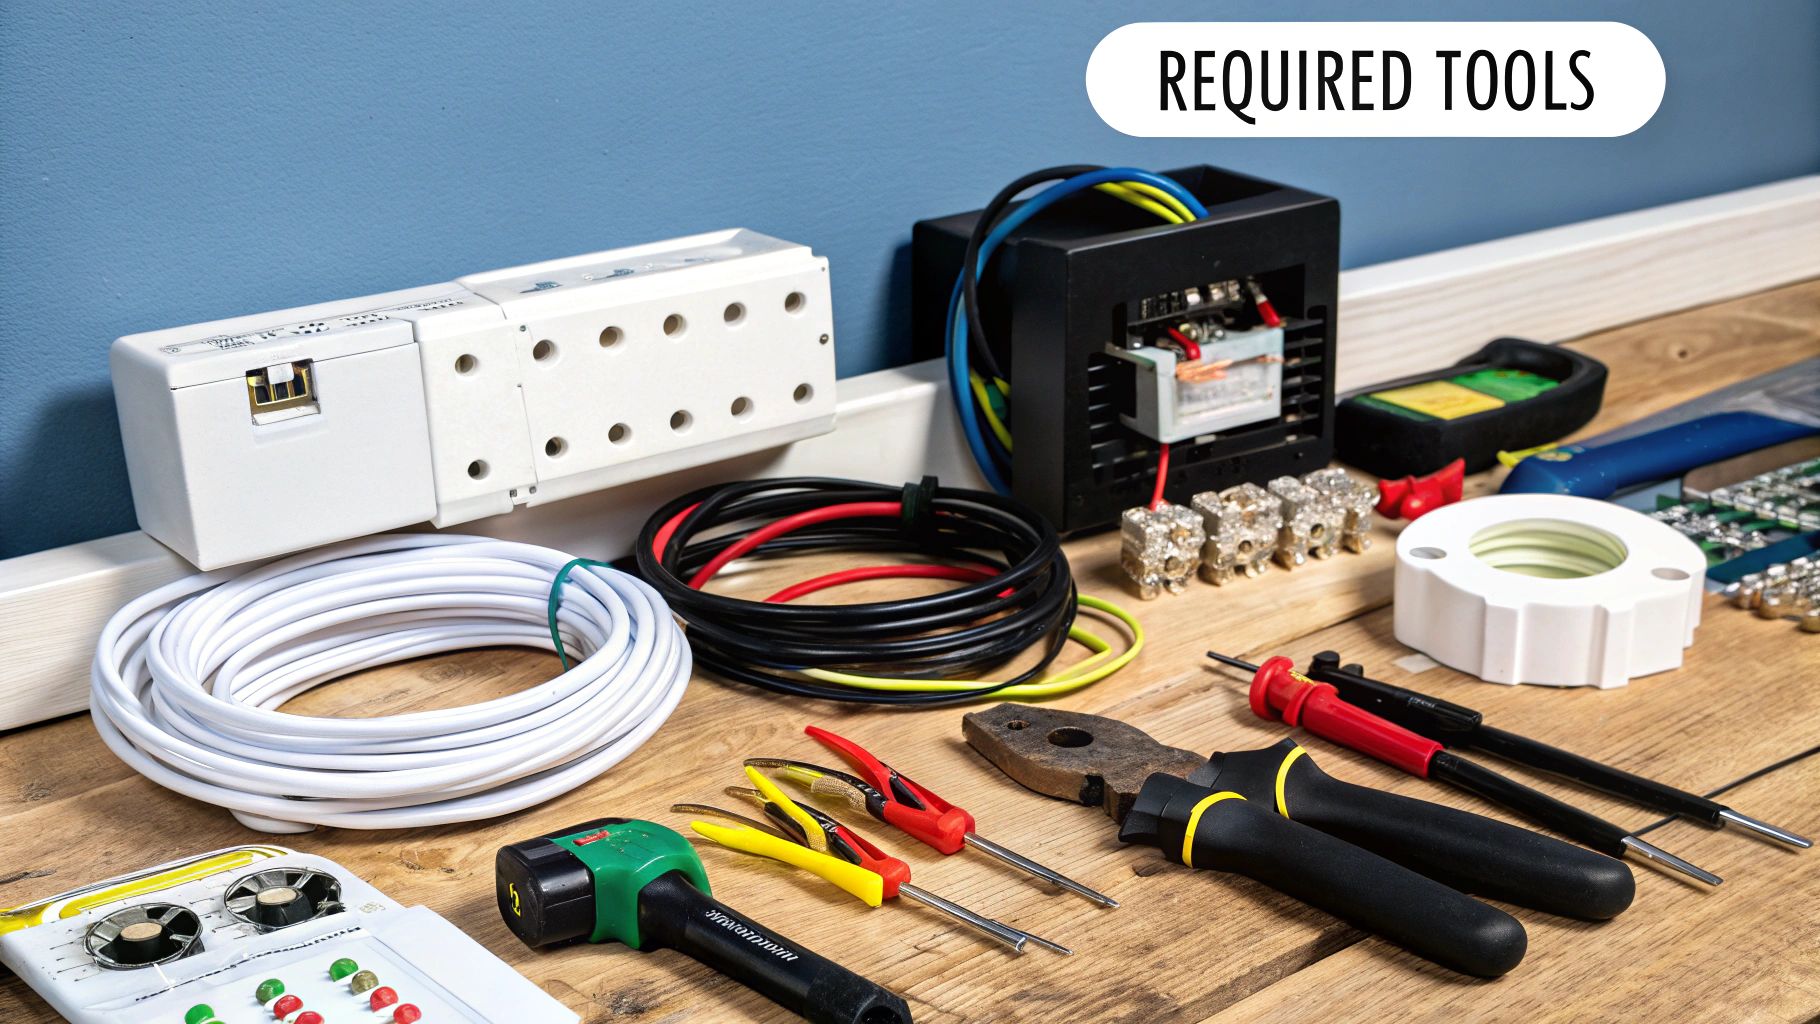
Before running a single wire, let's talk about gear. I've seen too many installations fail from using automotive parts. The marine environment is relentless; salt, moisture, and vibration will destroy standard components.
The cornerstone of any solid marine wiring job is marine-grade (tinned) copper wire. It's different from the wire in your car. Each copper strand is coated in tin, which is your best defense against corrosion.
The Must-Have Supplies
To do this job like a pro, you need the right supplies. These items are key to building durable, waterproof connections. They won't vibrate loose or let moisture in.
- Tinned Copper Lugs: You'll need these for solid connections to battery terminals or a fuse block.
- Heat-Shrink Butt Connectors and Terminals: These connectors have an adhesive lining that creates a waterproof seal when heated.
- Marine-Rated Inline Fuse Holder: This protects the circuit and should be placed near the battery.
My Two Cents: Always buy more wire and connectors than your measurements call for. There’s nothing worse than running out mid-project.
Having the right tools is just as important. A good ratcheting crimper is non-negotiable for creating a sound crimp. You also need a quality wire stripper and a heat gun to seal your connections.
Wiring Your Bilge Pump with a Three-Way Switch
Setting up a three-way (ON-OFF-AUTO) switch is the gold standard for any bilge pump installation. This setup gives you total control. You can turn the pump on anytime, and the float switch stands guard automatically.
Let's walk through a common scenario, like with a standard 1100 GPH pump.
The Basic Connections
First, understand the three terminals on your switch panel. You’ll see one for incoming power, another for the manual "ON" function, and a third for the "AUTO" side.
Start by running a positive wire from your fuse block to the "power" or "in" terminal on the switch. Next, run a wire from the "manual" terminal directly to the pump's positive (usually brown) wire. This creates your manual override circuit.
For the automatic side, connect the "auto" terminal on your switch to one wire on your float switch. Then, connect the other wire from the float switch to the same positive wire on the pump. This loop allows the float switch to act as the trigger.
This simple diagram helps visualize the flow:
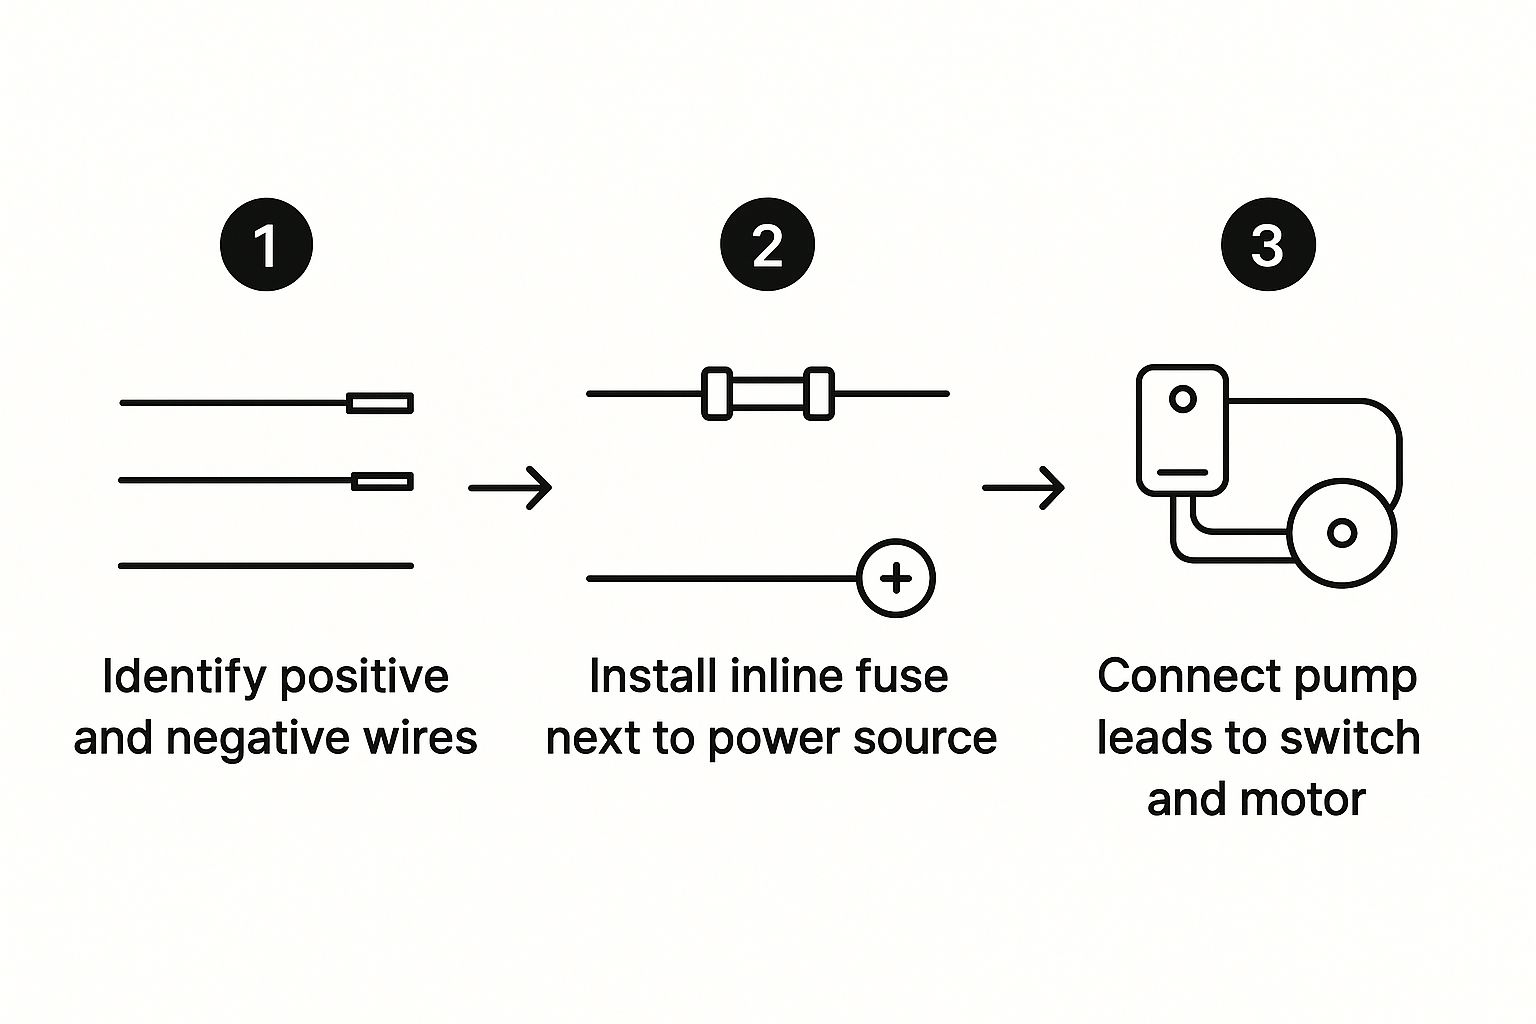
Everything starts with a protected power source and then branches out. The final step is connecting the pump's negative (black) wire to a ground bus bar or the battery's negative post.
A Tip from Experience: Always route your wiring as high and dry as possible. Keep it away from engine heat and moving parts. Secure the run with zip ties to stop it from chafing or vibrating loose.
Electric bilge pumps are now standard on over 70% of new boats. These systems, pulling 3 to 10 amps, must meet tough international standards. To learn about the standards driving these designs, you can explore detailed market analysis on Cognitive Market Research.
Selecting and Installing the Correct Fuse
Let's discuss the most important safety device in your bilge pump wiring circuit: the fuse. Its job is to protect your pump, wires, and boat from a dangerous electrical overload.
Choosing the right fuse isn't a guess. You must check the pump manufacturer's specs for the correct amperage rating. Using a fuse that's too large is asking for trouble because it won't blow when needed.
The fuse always goes on the main positive wire, as close to the power source as possible. This ensures the entire wire is protected. For more on your boat's power, see our guide on picking the right batteries for your boat.
Fuse Holder Options
You have two main options for installing a fuse: an inline fuse holder or a fuse block.
- Inline Fuse Holder: This is a waterproof housing you splice into the positive wire, perfect for a single-pump setup.
- Fuse Block: This is ideal for multiple accessories, creating a central, protected hub for your circuits.
A common mistake is connecting the automatic "hot" wire to a general accessory bus. If that bus turns off with your main battery switch, your pump is useless when you're away. This wire needs its own direct, fused connection to the battery for 24/7 protection.
The bilge pump market is projected to climb from USD 2.5 billion in 2024 to an estimated USD 4.1 billion by 2033. This growth highlights the demand for reliable, safe systems. You can read more about these bilge pump market trends on Verified Market Reports to see why proper wiring is crucial.
Troubleshooting Common Bilge Pump Wiring Issues
So you’ve wired everything up, but the pump isn't working. Don't worry, it happens. When it comes to bilge pumps, the wiring is almost always the first place to look.
When a pump won't turn on, resist the urge to start tearing wires out. First, check for a blown fuse. A blown fuse often signals a bigger issue, like a short or a seized pump motor.
If the fuse is good, inspect every connection point. Corrosion is the silent killer of marine electronics. Check for green or white crust on all terminals, as this can stop the flow of electricity.
Digging Deeper With a Multimeter
If a visual inspection doesn't solve it, grab a multimeter. Set it to DC volts and start at the source.
- Check for 12V power at the "in" terminal of your switch.
- If you have power, flip the switch to "ON" and test the "out" terminal.
- Power going in but not out means a bad switch.
- If the switch works but there's no voltage at the pump, you have a break in the wire.
What if the pump runs all the time? That's a classic sign of a failed float switch. It's either physically stuck "on" due to debris or has failed internally. Jiggle it by hand; if it doesn't click, it needs replacement.
My Two Cents: If you keep blowing fuses, you have a short circuit or a dying motor. Unplug the pump and put in a new fuse. If the fuse blows when you hit the switch, the short is in your wiring; if not, the pump motor is the problem.
Finding these problems early is key to avoiding an emergency. This is why a multimeter and spare fuses are a vital part of any boating emergency kit.
Common Wiring Faults and Quick Fixes
A systematic approach saves time and frustration. The table below outlines common symptoms, their likely causes, and how to fix them.
| Symptom | Likely Cause | Solution |
|---|---|---|
| Pump won't run at all | Blown fuse or tripped breaker | Replace fuse. Investigate for short or motor overload if it blows again. |
| Corroded or loose connections | Clean all terminals with a wire brush and secure all connections. | |
| Faulty helm switch | Test switch with a multimeter; replace if no power passes through. | |
| Pump runs continuously | Float switch stuck in "ON" position | Check for debris holding the float up; clean the bilge area around the switch. |
| Internally failed float switch | Manually test the switch. If it doesn't "click" off, replace the float switch. | |
| Pump cycles on and off quickly | Water back-flowing from the hose | Install or check the function of a check valve in the discharge hose. |
| Fuse blows repeatedly | Short circuit in the wiring | Disconnect the pump and test. Isolate the section of wire causing the short and replace it. |
| Seized or failing pump motor | The motor is drawing too much current. Replace the entire bilge pump. |
Think of this as your cheat sheet. By matching the symptom to the cause, you can quickly find the solution.
Bilge Pump Wiring Frequently Asked Questions

Even after a perfect installation, questions can arise. Let's tackle some common things boat owners ask after setting up a new pump.
Can I Connect My Bilge Pump Directly to the Battery?
No, you should never wire a pump directly to a battery without a fuse. A direct connection offers zero protection against electrical shorts or overloads. At best, you'll fry the pump motor; at worst, you could start a fire.
For a proper automatic setup, wire the float switch circuit directly to the battery. However, it is critical to always use a fuse. This ensures your automatic system has power 24/7, even when the main battery switch is off.
What Wire Gauge Is Best for a Bilge Pump?
The right wire gauge depends on your pump's amperage and the total wire length. A longer wire run or a powerful pump needs a thicker wire (a lower gauge number) to avoid voltage drop.
On a typical 12V system, a small pump with a short run might use 14 AWG wire. If you run that same wire 20 feet, you'll likely need 12 AWG or 10 AWG wire. Always follow the manufacturer's recommendation in your pump's manual.
Expert Tip: Skimping on wire size is a common mistake that starves the pump of power. It causes poor performance and overheating. When in doubt, always go one size larger (a lower gauge number).
Why Does My Bilge Pump Run But Not Pump Water?
If the motor is running but no water comes out, the issue is likely mechanical. Your wiring is probably fine.
Nine times out of ten, the problem is one of these things:
- A clogged intake screen at the bottom of the pump.
- A kinked or pinched discharge hose.
- An airlock trapped in the system.
Check the pump's intake for debris, then trace the discharge hose for kinks. If both are clear, you may have an airlock. Cycling the pump on and off a few times can often burp the air out.
For more information, you can check this resource on general electrical and plumbing FAQs.