When it comes to boat motor maintenance, consistency is everything.It's not about being a master mechanic; it's about having a simple, repeatable routine. A few disciplined checks on your fuel system, lubrication, and electrical parts can be the difference between a great day on the water and a long, frustrating tow back to the dock.
Your Essential Boat Motor Maintenance Checklist
Let’s be real. The secret to a dependable boat motor isn't some high-level mechanical wizardry. It's all about having a solid system you follow every time. A good maintenance checklist takes the guesswork out of the equation and gives you the confidence that your engine is ready to go when you are.
Think of this as your game plan for keeping your motor running for years. It’s not just about ticking boxes; it's about understanding why you're doing each check. Knowing that a tiny crack in a fuel line can lead to an engine stall, or that checking the gearcase lube can help you spot a failing seal early, turns these small tasks into powerful, preventative actions.
This visual guide breaks down the three most fundamental checks you can do in just a few minutes:
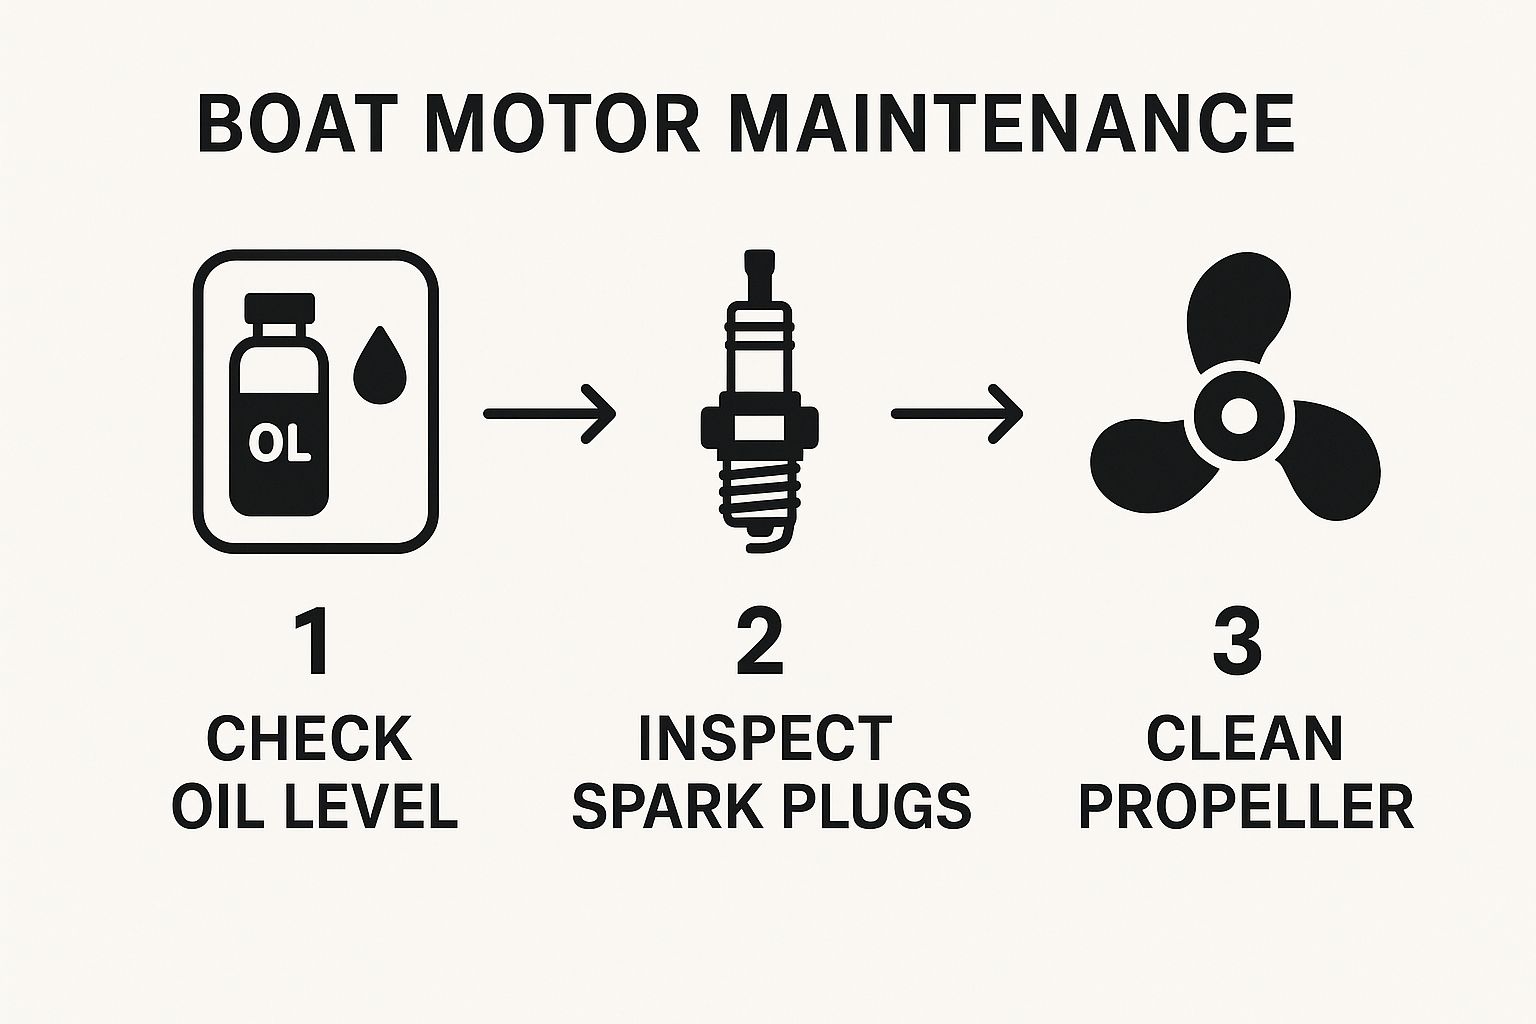
As the infographic shows, inspecting the oil, spark plugs, and propeller covers the absolute basics—lubrication, ignition, and propulsion. It's a quick yet critical foundation for any pre-launch inspection.
A Schedule You Can Stick To
The best way to stay on top of maintenance is to create a rhythm. Some jobs need to be done before every single trip, while others are fine on a monthly or yearly basis. When you break it down like this, the whole process feels much less overwhelming, and you're less likely to let something important slip through the cracks.
The goal is to make these checks second nature. A quick pre-launch scan should be as automatic as checking the weather forecast before you leave the dock.
This approach is about more than just dodging problems; it's about protecting your investment. And it seems more boat owners are catching on. The global boat repairing and maintenance services market is expected to grow from $6.59 billion to $7.18 billion soon, a clear sign that people understand how proactive care extends a boat's life.
For some extra hands-on tips that go hand-in-hand with this checklist, check out our guide on 8 tips for maintaining your outboard motor.
Seasonal Boat Motor Maintenance Schedule
To make your routine even easier, here’s a simple schedule that organizes key tasks by how often you should do them. Use this as a starting point to build a habit that fits your engine and how you boat.
| Frequency | Task | Purpose | Tools Needed |
|---|---|---|---|
| Pre-Launch | Inspect Propeller | Look for dings, cracks, or tangled fishing line that can destroy seals and hurt performance. | Prop wrench, block of wood |
| Pre-Launch | Check Engine Oil Level | Essential for four-strokes, this ensures proper lubrication and prevents major internal damage. | Clean rag, oil dipstick |
| Post-Trip | Flush the Engine | The single best way to remove corrosive salt, sand, and gunk from the cooling system. | Flushing muffs, freshwater hose |
| Monthly | Check Fuel Lines & Bulb | Feel for cracks, brittleness, or weak spots. A failed fuel line can ruin a trip fast. | Visual inspection, your hands |
| Monthly | Inspect Anodes | Check your sacrificial anodes. If they look 50% gone, it's time to replace them. | Screwdriver or socket set |
| Annually | Change Gearcase Lube | Check for a milky color (a sign of water) and replace the old, tired fluid. | Lube pump, flathead screwdriver |
| Annually | Replace Spark Plugs | Fresh plugs give you a strong spark for reliable starting and efficient fuel burn. | Spark plug socket, gapping tool |
Following this roadmap is the surest way to keep your motor in peak condition, season after season.
Getting a Handle on Your Motor's Fuel System

If there's one system that causes more headaches on the water than any other, it's the fuel system. I've seen it a thousand times. An engine starts sputtering or just quits entirely, and the owner is convinced they're looking at a major repair bill. But a surprising number of these "engine problems" trace back to something as simple as bad fuel or a hidden clog.
A big part of the problem is modern gasoline, especially the E10 ethanol blend. Ethanol is hygroscopic, which is a fancy way of saying it loves to pull moisture right out of the air. That water settles in your tank, leading to phase separation—a nasty sludge of ethanol and water that gets sucked right into your engine. It's an absolute recipe for poor performance and can cause real damage.
This is why a solid boat motor maintenance plan has to be about more than just using "fresh gas." You need to understand how today's fuel behaves and get in the habit of inspecting the entire system, from the tank all the way to the engine.
Check Your Fuel Lines and Primer Bulb
The path your fuel takes is lined with rubber and plastic parts that wear out over time. Your fuel lines and primer bulb are the first places to look, so don't just glance at them—get your hands on them.
A healthy fuel line should feel flexible. Squeeze it gently along its entire length. If you hit any hard, brittle spots or see obvious cracks, it's time for a replacement, no questions asked. A cracked line can suck in air, which will make your engine surge or stall out.
The primer bulb is another critical checkpoint. Give it a few good squeezes. It should feel firm and refill quickly. If the bulb feels mushy, stays collapsed after you squeeze it, or has cracks (check the ends where it connects to the line), it's failing. A weak bulb can't deliver the pressure your engine needs to run properly.
I've lost count of how many times I've helped someone with an engine that starts fine at the dock but dies the second they try to accelerate. Nine times out of ten, the culprit is a tired old primer bulb or a tiny, hidden crack in a fuel line that opens up under pressure.
The Unsung Heroes: Fuel Filters and Water Separators
Your engine has at least one fuel filter, but many boats also have a primary fuel-water separating filter mounted between the tank and the motor. These are absolute must-do maintenance items. A clogged filter will starve your engine of fuel, making it seem like you have a much bigger problem.
Think of that fuel-water separator as your engine's personal bodyguard. It’s built to trap not just gunk and debris, but also any water that's managed to sneak into your fuel tank. Checking it is straightforward:
- Take a Look: Most separators have a clear bowl on the bottom. Every few trips, just peek at it. Water is heavier than gas, so you'll see it as a distinct bubble or separate layer at the very bottom.
- Drain If Needed: If you see water, you can usually drain it from a small valve or screw at the base of the bowl. Catch the liquid in a clear jar to make sure you know what's coming out.
- Don't Just Drain and Forget: Finding more than a tiny bit of water is a red flag. Go ahead and replace the filter element, but also try to figure out how the water got in. A bad o-ring on your fuel cap is a really common cause.
A filter can get clogged so gradually that you might not even notice the slow loss of power until it’s nearly choked off completely. Making filter replacement an annual part of your routine is the cheapest insurance you can buy against getting stranded.
Using Fuel Stabilizers the Right Way
Fuel stabilizers are fantastic tools, but only if you use them correctly. My advice? Add a quality marine stabilizer to your fuel tank every single time you fill up, not just when you're putting the boat away for the winter. This practice fights the nasty effects of ethanol from day one and keeps your fuel in top condition.
When picking an additive, match it to your situation.
| Engine Type | Storage Duration | Recommended Additive Focus |
|---|---|---|
| Two-Stroke | Short-Term (1-3 months) | Look for an additive with ethanol protection and a carbon cleaner. |
| Four-Stroke | Short-Term (1-3 months) | A marine-specific stabilizer that excels at preventing phase separation is key. |
| Any Engine | Long-Term (3+ months) | Use a concentrated stabilizer specifically formulated for storage. |
Here's the trick: always add the stabilizer to the tank before you start pumping the gas. This allows the incoming fuel to mix it thoroughly. Afterwards, run the engine for 5-10 minutes to make sure that treated fuel circulates through the entire system—the lines, the filters, and right into the injectors or carburetor. It's a simple habit that prevents varnish and gum from building up, ensuring your motor fires right up when you turn the key.
Keeping Your Engine Cool Under Pressure
An overheating engine is the fastest way to ruin a perfect day on the water. It’s also one of the surest paths to catastrophic, wallet-draining damage. The cooling system is your motor's lifeline, a constant flow of raw water that keeps internal temperatures from reaching critical levels. Frankly, ignoring this part of boat motor maintenance is a gamble you just can't afford to take.
At the heart of it all is a small but mighty component: the water pump impeller. This flexible rubber "star" spins inside a housing, sucking in lake or ocean water and pushing it up through the engine's cooling passages. It's an brilliantly simple design, but that rubber impeller has a finite lifespan.
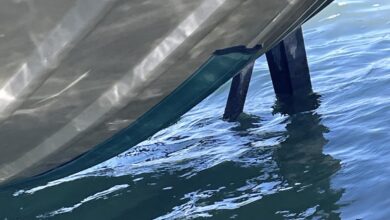
With time and use, the rubber gets brittle, loses its flexibility, or even sheds a vane. When that happens, its ability to pump water plummets, and your engine starts running hot. The most obvious clue is a weak or non-existent "pee stream"—that tell-tale stream of water spitting from the side of your motor. If that stream is just a sad dribble or gone completely, you've got a problem that needs your immediate attention.
Spotting a Failing Impeller
A weak tell-tale is the classic sign, but it's not the only one. Sometimes, a simple clog in the outlet tube itself can give you a false alarm. A much more reliable signal is your engine's temperature gauge climbing into the red or the shrill sound of an overheat alarm. If that alarm goes off, shut the engine down immediately and start troubleshooting.
When an engine overheats, the issue usually boils down to one of these culprits:
- A Worn Impeller: This is the most common reason, by far. It's just too worn out to move enough water.
- Debris Blockage: We've all done it—sucked up a plastic bag, a clump of weeds, or a scoop of mud. This stuff easily clogs the raw water intake screens on the lower unit.
- A Stuck Thermostat: If the thermostat gets stuck in the closed position, it stops water from circulating through the engine block, causing a rapid overheat.
- Clogged Passages: For those of us in saltwater, salt and mineral deposits can build up inside the engine's narrow passages over time, slowly choking off the water flow.
I once helped a buddy whose engine kept overheating even though he’d just put in a brand-new impeller. After scratching our heads for a bit, we discovered a small chunk from the previous, shredded impeller had shot up into the system and lodged itself right next to the thermostat. That's a perfect example of why it's so important to hunt down all the pieces of a failed impeller if you can.
The Non-Negotiable Post-Trip Flush
The single best piece of preventative maintenance you can do for your cooling system is to flush the engine with fresh water after every single trip. This is absolutely critical if you boat in saltwater, but it’s just as vital for freshwater boaters dealing with sand, mud, and algae.
Flushing does two crucial things:
- It rinses away corrosive salt before it can set in and eat away at the metal components of your engine.
- It clears out any sand, silt, or bits of weed that got sucked in during your day on the water.
Most modern outboards have a dedicated garden hose fitting that makes this ridiculously easy. If yours doesn't, a simple set of "earmuffs" that clamp over the water intakes on the lower unit will do the job perfectly. Just connect the hose, turn on the water, and run the engine at idle for about 10-15 minutes. It’s a small ritual that pays massive dividends in engine longevity.
This kind of routine care is what separates a reliable motor from one that's always in the shop. In fact, keeping older motors running is the backbone of a growing industry. The specialized outboard motor rebuild service market, currently valued around USD 0.15 billion, is projected to nearly double in the next decade. These pros focus on restoring motors to peak condition, a process that always starts with fundamentals like a clean, functional cooling system. You can see more data about the outboard motor rebuild service market here.
Inspecting and Replacing Your Impeller
Replacing a water pump impeller is a job that most DIY-savvy boaters can tackle with a basic set of tools. The rule of thumb I've always followed is to replace it every two years or every 200 hours of use—whichever comes first. Don't wait for it to fail and leave you stranded.
The job involves dropping the lower unit (the gearcase), opening up the water pump housing, swapping the old impeller for a new one, and putting it all back together. It’s a straightforward but absolutely essential piece of boat motor maintenance that ensures your engine stays cool under pressure, season after season.
Essential Lubrication and Oil Change Procedures
Proper lubrication is the absolute lifeblood of your engine. It's that thin, precious film of oil that stands between high-speed metal parts, preventing them from grinding themselves into an expensive pile of shavings. Think of it as the tireless guardian against friction and wear. Getting this part of boat motor maintenance right isn't just a suggestion; it's fundamental to your engine’s long-term survival.
If you own a four-stroke, the process will feel a bit like changing the oil in your car, but with a few crucial, marine-specific twists. For those of you running a classic two-stroke, your main focus will be on the gearcase lube—a task that's every bit as critical. Let's walk through these hands-on procedures so you can keep your motor protected out on the water.
Mastering the Four-Stroke Oil Change
Changing the oil in your four-stroke outboard is more than just swapping old fluid for new. It's your best chance to get a real look at the health of your engine's internals. The goal here is a clean, efficient, and thorough job.
First things first, warm up the engine for a few minutes. Running it on a flushing hose ("on the muffs") gets the oil warm and flowing, which is key. This helps suspend any gunk and contaminants so they drain right out with the old oil. Once it's warm, shut it off and let it settle for a moment.
The secret to a mess-free oil change is having all your supplies ready to go: a correctly sized oil filter wrench, a drain pan, fresh marine-grade oil that meets your manufacturer’s specs, a new oil filter, and a generous supply of shop rags.
- Draining: Get your drain pan situated under the drain plug. Loosen the plug and let the oil drain completely. As it drains, pay close attention to its appearance. It should be dark, but if it looks milky or has a frothy, "milkshake" consistency, that’s a massive red flag signaling water intrusion.
- Filter Change: While the oil is draining, go ahead and remove the old oil filter. Be ready for a little oil to spill out, it's inevitable. Before you spin on the new filter, take a finger and lightly coat its rubber gasket with a film of new oil. This small step is crucial for getting a perfect, leak-free seal.
- Refilling: Once the last drop of old oil has drained, replace the drain plug (use a new gasket if your engine requires one) and tighten it to the specified torque. Now, you can refill the engine with the correct amount of new oil, checking the level with the dipstick as you pour.
Don’t just dump all the oil in at once. I’ve seen people do it, and it often leads to overfilling. Pour in about 80% of the required volume, then add the rest slowly, checking the dipstick each time. Overfilling a four-stroke can be just as damaging as underfilling it, often leading to blown seals and poor performance.
Gearcase Lube for All Engine Types
Whether you're running a two-stroke or a four-stroke, your gearcase demands regular attention. This sealed unit contains a set of gears operating under extreme pressure, and that thick, honey-like gear lube is the only thing protecting them from catastrophic failure.
Checking and changing your gearcase lube at least annually is a non-negotiable task. You'll need a big flathead screwdriver (the drain screws are often very tight), a gear lube pump, and fresh marine gear lube.
Position a drain pan under the lower unit. You'll see two large, slotted screws: a lower drain screw and an upper vent screw.
Here's the trick: always remove the bottom screw first. Then, slowly loosen the top vent screw. As air enters through the top hole, the old lube will begin to drain from the bottom. This is your moment of truth.
Take a good look at the fluid coming out. A dark honey or even black color is perfectly normal. What you absolutely don't want to see is a creamy, milky, or coffee-colored fluid. This means water has breached your propshaft seals—a serious problem you need to fix immediately before you end up with a grenaded lower unit.
To refill, attach your lube pump to the lower drain hole and start pumping in fresh lube. Keep going until you see it begin to seep out of the upper vent hole. That's your sign the gearcase is full. Working quickly, replace the top vent screw first, then remove the pump and rapidly replace the bottom drain screw.
Engine Oil and Lubricant Comparison
Choosing the right fluids is just as important as the changing process itself. Using the wrong oil or lube can lead to poor performance and accelerated wear. Here's a quick breakdown of common types to help you make the right choice at the marine supply store.
| Lubricant Type | Best For | Key Benefit | Change Interval |
|---|---|---|---|
| FC-W 4-Stroke Oil | Modern four-stroke outboards and sterndrives | Formulated with rust/corrosion inhibitors for marine use | 100 hours or annually |
| TC-W3 2-Stroke Oil | Direct injection or pre-mix two-stroke outboards | Clean-burning to minimize carbon buildup and piston ring sticking | N/A (consumed with fuel) |
| Marine Gear Lube | Outboard and sterndrive lower units (gearcase) | Extreme pressure additives to protect gears under high load | Annually or 100 hours |
| Marine Grease | Steering tubes, tilt mechanisms, propeller shafts, and other pivot points | Water-resistant and prevents corrosion and seizing | As needed, or annually |
This table simplifies your options, but your owner's manual is always the final authority. Stick with what the manufacturer recommends to ensure your warranty stays intact and your engine runs its best.
Essential Greasing Points
Beyond the engine and gear oil, don't overlook external lubrication. There are several key pivot points on your motor that need regular greasing to ensure smooth operation and fend off corrosion.
Grab a grease gun loaded with a quality marine-grade grease and apply a small amount to these spots:
- The steering tube and tilt tube
- All throttle and shift linkages
- The propeller shaft splines (a perfect time to do this is when you have the prop off for inspection)
This is a five-minute job that makes a world of difference. It prevents expensive parts from seizing up and keeps your steering and shifting feeling buttery smooth. Trust me, you'll feel the difference at the helm.
Checking Your Prop and Electricals: The Often-Forgotten Essentials

It's easy to get laser-focused on what’s happening inside the engine, but from my experience, some of the most common headaches start at the propeller and the battery. These two areas are notorious for causing problems that can stop you in your tracks, yet they are surprisingly simple to include in any solid boat motor maintenance schedule. A dinged-up prop can drain your wallet at the fuel dock, and a single bad connection can end your day before you even cast off.
First, just give your propeller a good look-over. You're searching for any obvious dings, bent blades, or chunks of missing metal. Even a small imperfection can throw the whole thing off balance, leading to vibrations that put extra stress on your seals and bearings. More than that, it wrecks your boat's performance and can even drive up your fuel consumption by 10% or more. That's a steep price for something so easy to check.
The Sneaky Damage from Fishing Line
There’s one critical prop check that requires a little more effort. About once a month, you really need to pull the propeller completely off to inspect the propshaft behind it. All you need is a prop wrench and a block of wood to keep the prop from spinning while you loosen the nut.
With the prop off, peer closely at the shaft. You're hunting for fishing line. It's wild how easily a stray piece of monofilament can wrap around the shaft, winding itself tighter and tighter. Eventually, it works its way into the propshaft seals and slices them open. This is a surefire way to kill your gearcase, as water gets in and turns your gear lube into a milky, useless mess.
If you find tangled line, consider it a warning. Carefully cut every last bit of it away. This quick, five-minute task can honestly save you from a repair bill that runs into the thousands.
How to Avoid That Dreaded 'Click'
There is no sound more infuriating to a boater than turning the key and hearing a single, lonely "click." Nine times out of ten, that's an electrical problem, not a dead engine. The key is prevention, which means keeping every connection clean, tight, and shielded from the harsh marine environment.
Start right at the source: your battery. Pop the lid and take a close look at the terminals. Any of that crusty, fuzzy buildup—usually white or greenish-blue—is corrosion. It’s an insulator, and it’s blocking the power your engine needs to turn over.
I tell every boater the same thing: a clean, tight connection is just as important as a fully charged battery. I've seen brand-new batteries fail to start an engine simply because of a thin layer of corrosion on the terminals. It’s the simplest fix that prevents the biggest headaches.
Of course, having the right battery for the job is crucial. If you're not sure, our guide on picking the right batteries for your boat is a great place to start.
Your Quick Electrical System Checklist
Here’s a straightforward routine to keep your electrical system in top shape and make sure you never hear that dreaded "click" again.
-
Scrub the Terminals: Disconnect your battery cables—always start with the negative one. Use a wire brush or a dedicated terminal cleaning tool to scrub the battery posts and cable connectors until they're bright and shiny.
-
Trace the Wires: Follow the main battery cables from the battery to the engine. Feel for any cracks in the plastic insulation or bulges that hint at corrosion growing inside the wire. Give the connections at the starter and engine block a gentle tug to make sure they're secure. A loose ground wire is a classic culprit for all sorts of electrical gremlins.
-
Check Spark Plug Wires: Give the boots on your spark plug wires a gentle twist and pull. You want to feel them seated firmly on the plugs. A loose boot can cause a cylinder to misfire, which makes the engine run rough and robs you of power.
After everything is clean and reconnected, finish the job by applying a thin coat of dielectric grease to the terminals. This creates a barrier that locks out moisture and stops new corrosion in its tracks. It's a cheap, simple step that guarantees the power flows exactly where it needs to.
Got Questions? Let's Talk Boat Motor Maintenance
Even the most detailed checklist can't cover every specific question that pops up when you're elbows-deep in your engine. It’s one thing to know what to do, but it's that nagging why or when that can make you second-guess yourself. We get it. Let’s tackle some of the most common questions we hear from boaters, clearing up the confusion so you can work with confidence.
How Often Should I Really Service My Motor?
This is easily the most asked question, and the honest answer is: it depends, but there’s a rock-solid rule of thumb to follow. For most outboards, manufacturers recommend a full service every 100 hours of operation or at least once a year—whichever comes first. This isn't just a number they pull out of a hat; it’s carefully calculated based on how long things like oil, filters, and impellers typically last under normal conditions.
If you’re a weekend warrior who only puts 30-40 hours on the clock each season, don't skip that annual service. Engine fluids degrade over time whether you're running the boat or not. Rubber components can get brittle, and corrosion never takes a day off. Sticking to that yearly schedule is your best defense against small problems turning into trip-ending disasters.
I always tell people to think of the 100-hour/1-year rule as your baseline. If you're constantly in harsh saltwater, love running at high RPMs, or just notice something feels a little "off," don't wait. Be proactive. A little extra care goes a long way.
Can I Use Automotive Oil In My Four-Stroke Outboard?
It's tempting to grab that jug of car oil to save a few bucks, but the answer here is a hard no. While you might see the same viscosity rating, like 10W-30, what's inside the bottle is completely different. Marine-grade engine oil is packed with a special blend of rust and corrosion inhibitors specifically formulated for the wet, often salty, marine environment.
Your car's engine isn't designed to sit for weeks on end with humid air circulating through it, but your outboard is. Standard automotive oil just doesn't have the right additives to fight off the internal rust that can build up between trips or during storage. For peace of mind, always use an oil that meets the FC-W (Four-Cycle Water-Cooled) certification.
What Is The Best Way To Store My Motor For The Winter?
Proper winterization is a non-negotiable ritual if you live in a cold climate. The goal is simple: get all the water out and protect the fuel system from going bad.
Here’s what matters most:
- Fuel First: Fill your tank to about 90% to minimize condensation, then add a quality marine fuel stabilizer. Don't just dump it in and walk away—run the engine for a good 10-15 minutes. This makes sure the treated fuel works its way through every line, the filter, and the injectors or carburetor.
- Flush and Drain: Flush the engine thoroughly with fresh water to get rid of salt and silt. Afterward, it's absolutely critical to drain all the water from the block. If water freezes inside, it can easily crack expensive engine components.
- Fresh Lube: Winterization is the perfect time to change your engine oil and your gearcase lube. This gets rid of any moisture, acids, or other nasty contaminants that could silently cause damage while the engine sits idle for months.
With boating's popularity on the rise, proper upkeep has never been more important. The global outboard engine market is expected to hit around 684,000 units soon, and a huge chunk of those will be in climates requiring seasonal storage. You can read more about what's coming in the 2025 outboard engine market here.
My Motor Is Sputtering—What Should I Check First?
An engine that starts sputtering or running rough can really spike your blood pressure, but don't jump to the worst-case scenario. More often than not, the culprit is something simple related to fuel or spark.
Before you start tearing things apart, walk through this quick three-step check:
- Check the Primer Bulb: Give it a squeeze. Is it firm or does it feel soft and mushy? A soft bulb means it's not full of fuel. Pump it until it gets firm and see if the engine smooths out.
- Inspect the Fuel Filter: Look at the fuel-water separator bowl. Can you see water sloshing around at the bottom or any gunk? A clogged filter is one of the most common reasons for an engine to be starved of fuel.
- Wiggle the Spark Plug Wires: Make sure each spark plug boot is pushed down firmly onto its spark plug. It's surprisingly easy for one to work itself loose, causing a misfire that feels like a major problem.
These simple checks solve the issue a surprising amount of the time. For more in-depth troubleshooting tips, we have plenty of other articles on boat maintenance.
At Boating Articles, our mission is to arm you with the practical knowledge to handle these situations like a pro. Dive into our library of guides and reviews to make every trip on the water a safe and memorable one. Find everything you need at https://boating-articles.com.