Dropping anchor might seem like the simplest thing in the world—just toss a heavy weight overboard, right? But any seasoned boater knows there's an art to it. Real anchoring mastery comes from understanding that your anchor, rode, and shackles are a complete system. It's your ground tackle, and when the wind pipes up, it's arguably the most critical piece of safety gear you own.
Choosing Your Anchoring Gear Like a Pro
A top-of-the-line anchor is worthless if it's connected to a flimsy rode or a suspect shackle. Your ground tackle is a chain of components, and it's only as reliable as its weakest link. Getting it right isn't about spending a fortune; it's about making smart choices that match your boat, the places you'll be dropping the hook, and the conditions you expect to face.
Think of it this way: you wouldn't put skinny street tires on a Jeep you plan to take mudding. The same logic applies here. The perfect anchor for the soft mud in a protected cove might just skate uselessly across a rocky bottom when you need it most.
Selecting the Right Anchor Type
The anchor itself gets all the attention, and for good reason. But its performance is entirely dependent on the type of seabed it needs to bite into. The big three you'll see everywhere are the Danforth (or fluke-style), the plow, and the claw. Each has its own personality and excels in different situations.
- Danforth (Fluke) Anchors: These are light for their size and have incredible holding power in soft sand and mud. Their big, flat flukes dig in deep. The trade-off? They can have a tough time on weedy or rocky bottoms, often just skipping along without ever getting a grip.
- Plow Anchors: Shaped just like their namesake, these anchors are designed to do one thing: dig. They are fantastic all-rounders, performing reliably in sand, clay, and mud. Their dependable nature has made them a long-time favorite for cruisers who have to be ready for anything.
- Claw (Bruce) Anchors: These were originally developed for monster oil rigs, so you know they mean business. Claws set fast and hold tight in an impressive variety of seabeds, even doing well in rock where others fail. A big plus is their tendency to reset themselves if the wind or current shifts direction.
The boating world is full of options. The global market for boat anchors was valued at around USD 3.26 billion, a number that's expected to climb as more people get out on the water. While classic plow anchors are still incredibly popular, innovative designs like the Rocna and Mantus are earning fierce loyalty for their incredible holding power and quick setting. For a deeper dive into market trends, you can read the full market analysis to learn more about industry trends.
Anchor Type Performance by Seabed
Choosing an anchor isn't just about brand names; it's about matching the design to the bottom. I've seen too many skippers get into trouble because their anchor was a poor match for the ground beneath them.
This table breaks down how the most common anchor types typically perform across different seabeds. Use it as a starting point to narrow down your options.
| Anchor Type | Best For (Seabed) | Good For (Seabed) | Poor For (Seabed) |
|---|---|---|---|
| Danforth/Fluke | Sand, Mud | Clay | Rock, Grass, Shale |
| Plow | Sand, Clay, Mud | Gravel | Hard Rock, Kelp |
| Claw/Bruce | Rock, Sand, Coral | Mud, Clay | Dense Weed |
| Rocna/Mantus | Most Conditions | Most Conditions | Thick Kelp |
Ultimately, your primary cruising grounds should dictate your primary anchor. If you're always in soft mud, a Danforth is a great, lightweight choice. If you're a coastal cruiser facing a bit of everything, a new-generation scoop anchor like a Rocna might be your best bet.
Matching Anchor Weight to Your Boat
Once you've settled on a type, you need to get the size right. This is non-negotiable. An undersized anchor is a genuine safety hazard, plain and simple. On the flip side, a ridiculously oversized anchor just adds unnecessary weight to your bow.
Anchor manufacturers provide charts that are a solid starting point. My advice? Look at their recommendation for your boat's length and then seriously consider going one size up. That extra weight provides a welcome margin of safety when a surprise squall rolls through in the middle of the night.
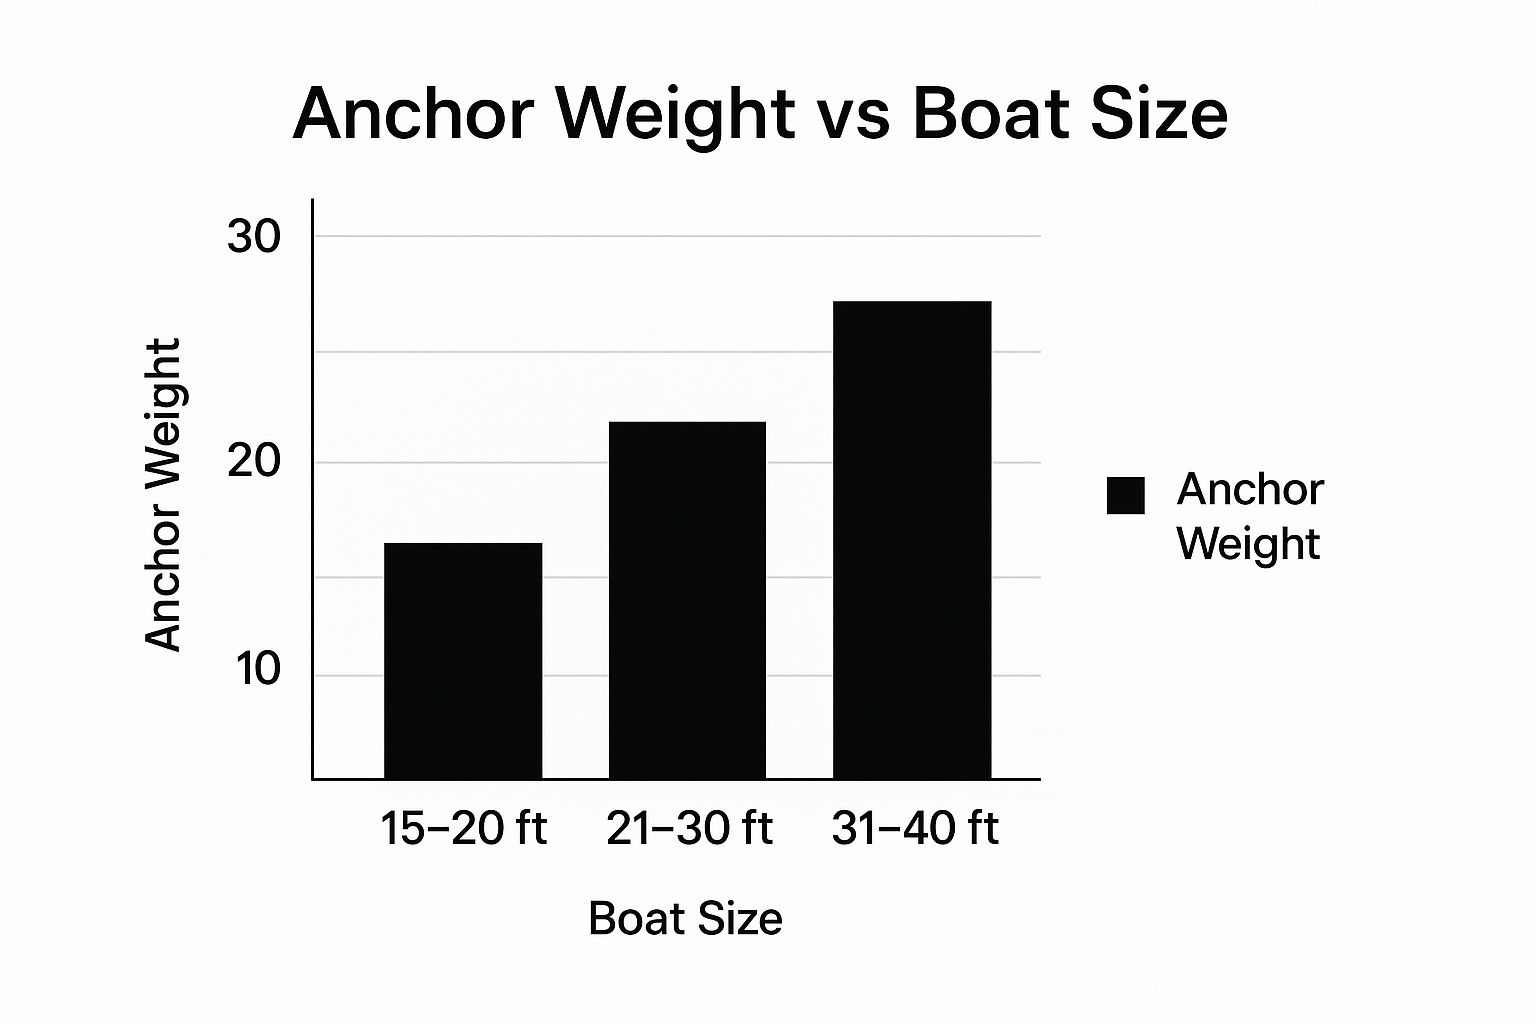
As you can see, the required anchor weight doesn't just inch up—it increases substantially as your boat gets bigger and heavier. It's all about having enough mass to get a secure bite and hold against the forces of wind and current.
The Great Debate: All-Chain vs. Rope-Chain Rode
The rode is what connects that carefully chosen anchor to your boat. The decision usually boils down to two camps: an all-chain rode or a combination of rope and chain.
For serious cruisers, an all-chain rode is the gold standard. Its sheer weight does two crucial things: it helps the anchor shank lie flat for a better initial set, and it provides incredible resistance to chafe on rocky or coral bottoms. That weight also creates a natural curve, or catenary, which acts like a shock absorber, softening the jarring tugs from wind and waves.
A heavy all-chain setup is fantastic, but it has almost no elasticity. In strong winds, you absolutely need to use a nylon snubber or bridle. This introduces some much-needed stretch, taking the brutal shock loads off your deck hardware and silencing that awful grating sound of the chain on your bow roller.
A rope-chain combination is a perfectly viable alternative, especially for smaller boats or those doing mostly coastal day-tripping. It’s lighter, less expensive, and easier on your back. You get a short length of chain (15-30 feet is typical) connected to the anchor, with the rest of the rode being nylon rope. The chain provides the weight needed for a good set and protects against abrasion on the seabed, while the nylon rope offers excellent stretch and is much easier to handle without a windlass.
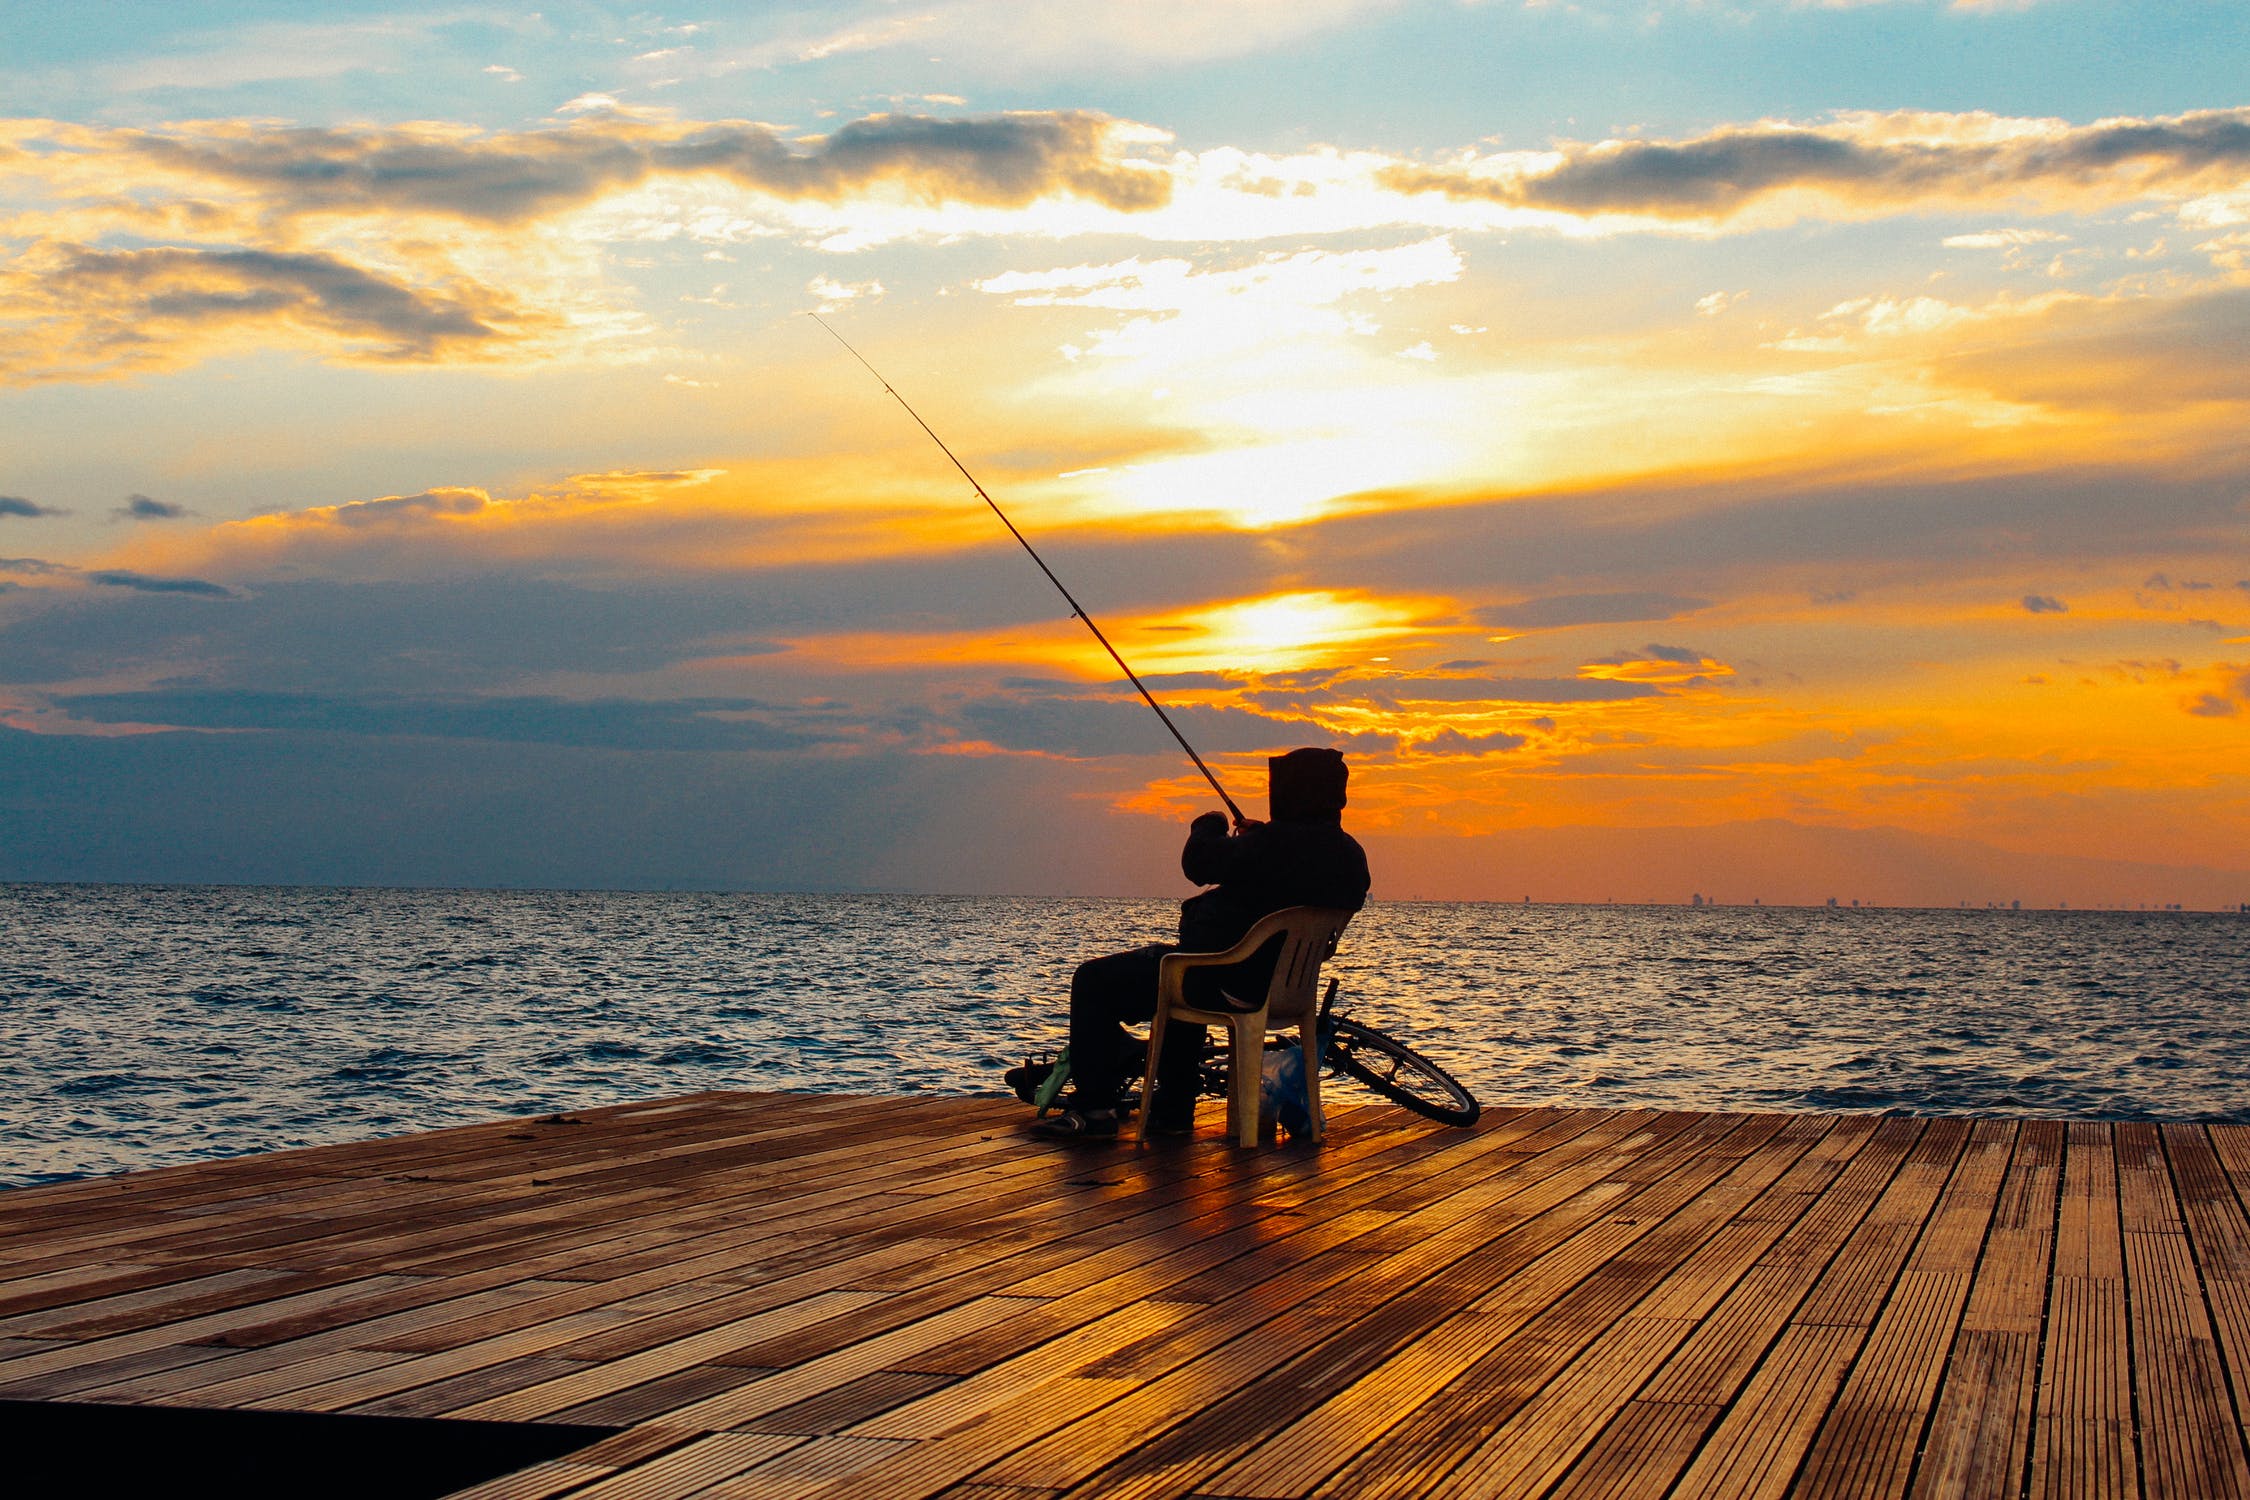
How to Find the Perfect Anchorage
Where you decide to drop the hook is every bit as important as how you do it. I’ve seen it happen time and again: a gorgeous, secluded cove turns into a boater’s worst nightmare because of poor holding ground or an unexpected wind shift. Choosing the right spot is a real skill, one that blends good old-fashioned chart reading with modern weather forecasting and a healthy dose of situational awareness.
It's not just about finding a pretty spot. It’s about finding a safe one. And that process starts with your nautical charts, whether they're paper charts spread on the salon table or pixels on your chartplotter. Think of them as your treasure map to a peaceful night at anchor.
Reading the Charts Like a Story
A nautical chart tells you everything you need to know about what’s happening beneath your keel. Of course, the first thing everyone checks is the depth. You need enough water to keep you floating at low tide, but not so much that you’re paying out every last foot of anchor rode. Personally, I look for a sweet spot with a consistent, moderate depth, usually around 15 to 30 feet.
But depth is just chapter one of the story. The real secret is decoding the little abbreviations that tell you about the sea bottom.
- S: Sand
- M: Mud
- Cl: Clay
- G: Gravel
- R: Rock
You'll have a great night's sleep over sand, mud, or clay. These seabeds offer fantastic holding for most common anchor types. Rock, on the other hand, can be a gamble. Your anchor might get a solid bite, or it could just skate along the bottom, never digging in. Even worse, it might get wedged in so tightly you can’t get it back.
Pro Tip: Always anchor for the weather you expect, not the weather you have. A gentle evening breeze can morph into a 20-knot blow from the opposite direction by 3 a.m. Check the forecast and pick a spot that gives you protection from where the wind will be, not just where it is now.
Calculating Your Swing Room
Once you've identified a promising area on the chart, it’s time to think about swing room. As the wind or current shifts, your boat will pivot around its anchor. You have to be absolutely certain you won't swing into another boat, a shoal, or the shoreline. This is a classic mistake, and it catches way too many boaters off guard.
Imagine a giant circle with your anchor at the dead center. The radius of that circle is the length of your anchor rode plus the length of your boat. Let’s say you’re in 20 feet of water and put out a 7:1 scope—that’s 140 feet of rode. If you have a 40-foot boat, your total swing radius is 180 feet. You need a completely clear 360-degree circle with a 180-foot radius around your anchor's position.
This math is absolutely critical, especially in a crowded harbor. Always assume the boats around you have let out a similar amount of rode and give them a wide berth. I'd much rather anchor a little farther out and have a longer dinghy ride than be woken up by the sound of crunching fiberglass. Speaking of being prepared, having strong, reliable lines for all situations is key. The same principles for choosing strong, chafe-resistant ropes apply to more than just anchors; you can see what I mean in our guide on how to choose the best size and type of dock lines.
Final On-Site Assessment
The chart gives you the plan, but your own eyes give you the final confirmation. As you motor slowly into your chosen spot, watch your depth sounder to make sure it matches what the chart promised.
Take a look at how other boats are sitting at anchor. This is a fantastic real-time clue to the effects of the current wind or current. If you have a fishfinder with a bottom-reading display, use it! Getting a clear visual of a soft, muddy bottom on your screen right before you drop the hook provides a huge boost of confidence. It’s that final piece of the puzzle, telling you you’ve found the perfect home for the night.
Setting Your Anchor for a Secure Hold
This is where the rubber meets the road—or rather, where the anchor meets the seabed. All your careful planning comes down to this moment. Doing it right isn't just about dropping a heavy object overboard; it's a practiced skill that separates a peaceful night's sleep from a stressful, anchor-dragging ordeal.
The whole process starts with a slow, deliberate approach. You always want to motor into the wind or current, whichever is the stronger force. This is a non-negotiable part of the process. It gives you far more control and lets you see exactly how the boat will naturally lie once you're settled.
The Controlled Approach and Drop
As you get close to your chosen spot, ease back on the throttle until you're barely moving. Your goal is to come to a gentle stop right over the spot where you want the anchor to land. Don't rush this part. Overshooting your mark just means you have to circle around and try again, which is always frustrating.
Once you’re hovering over the target, bring the boat to a dead stop. Now, you can begin to lower the anchor. I can't stress this enough: lower it, don't throw it. Heaving the anchor and a pile of chain over the side is a surefire way to get a fouled anchor. The chain can easily wrap around the stock or flukes, making it impossible for it to dig in properly.
Whether you're using a windlass or paying it out by hand, let the rode out smoothly so the anchor drops straight down to the bottom.
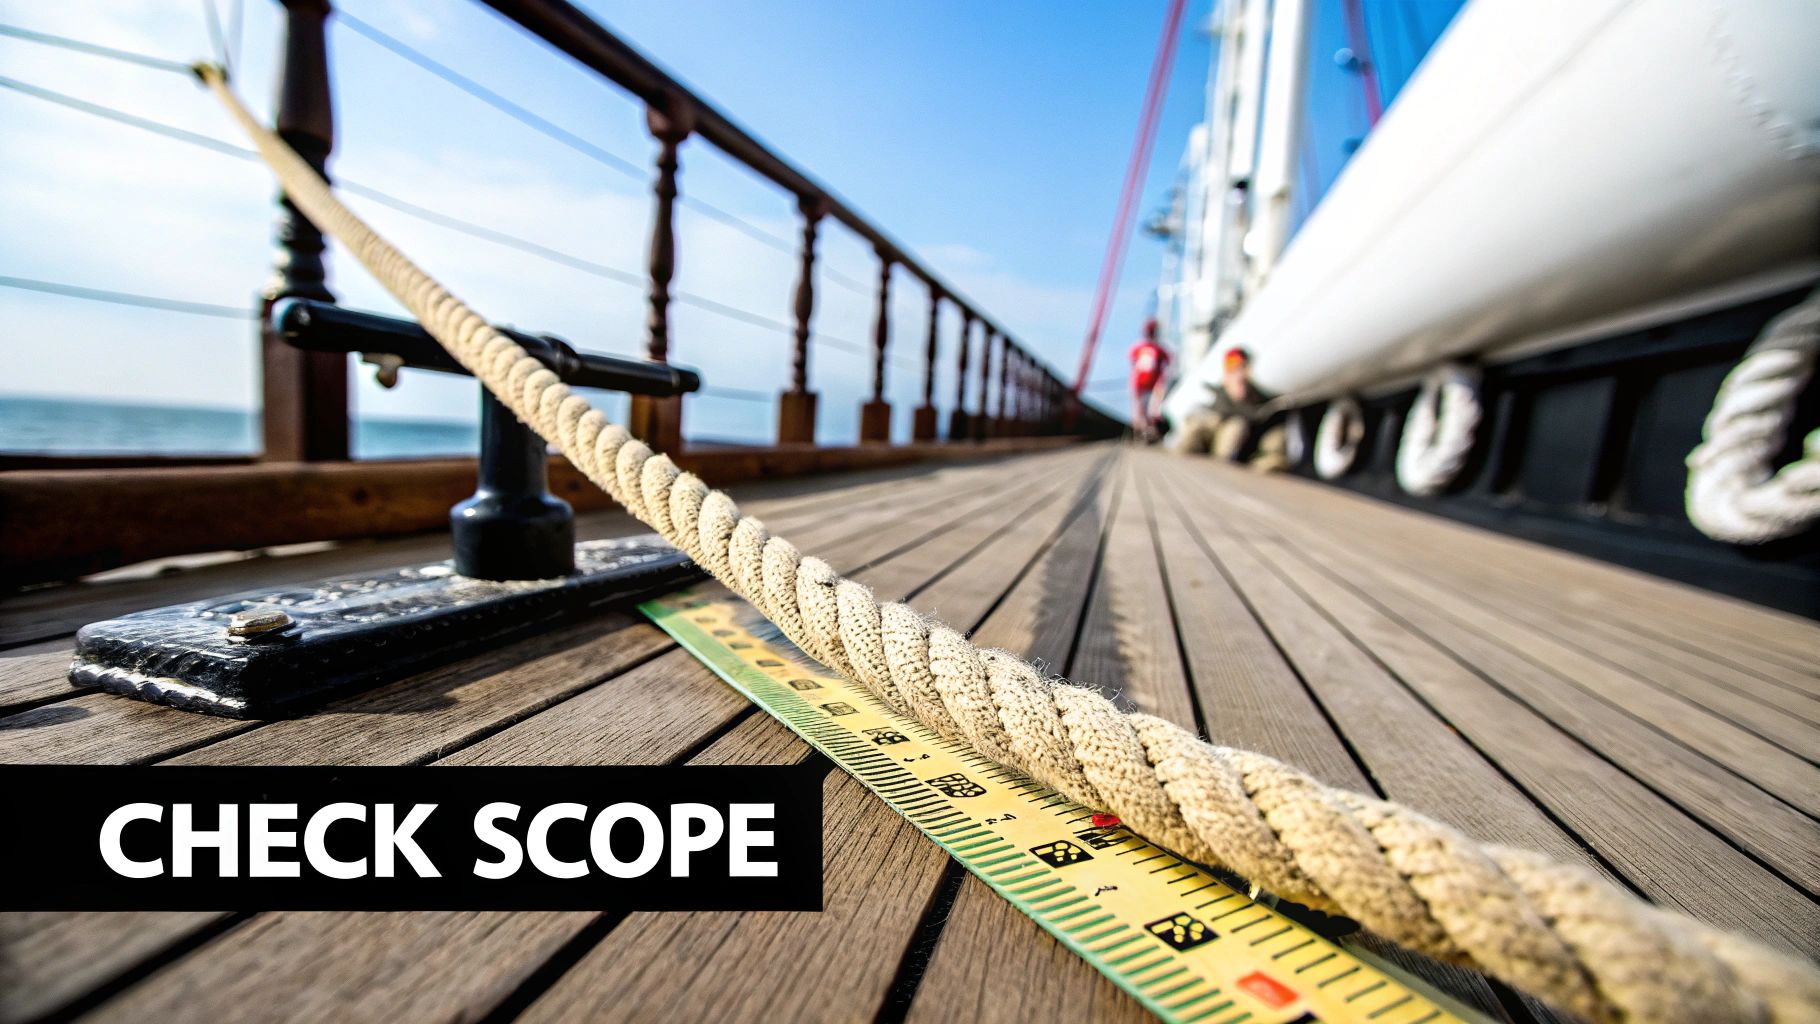
Mastering Scope for a Secure Set
With the anchor now resting on the seabed, your boat will naturally start to drift backward. This is when you pay out your scope, which is simply the ratio of rode length to water depth. Honestly, getting the scope right is probably the single most important factor in whether your anchor holds firm.
Think of it this way: a short scope (like 3:1) pulls the anchor mostly upward, which will pop it right out of the bottom. A longer scope (like 7:1 or more) creates a horizontal pull along the seabed. This is what lets the anchor's design do its job, allowing it to dig in deep and grip tight.
- Good Conditions: A 7:1 scope is the gold standard. In 20 feet of water, that means you'll pay out 140 feet of rode (20 x 7).
- Pro Tip: Remember to measure the depth from your bow roller, not the waterline. Add your boat's freeboard (the distance from the water to the deck) to the charted depth for a truly accurate measurement.
Feeling the Bite
As the rode pays out and your boat moves back, you'll feel the line start to snub up and tighten. This is the moment of truth. You should be able to literally feel the anchor start to bite. With an all-chain rode, it's often a distinct, low-frequency shuddering sensation that travels up the chain as the anchor plows into the bottom.
Once you have the right amount of scope out, make the rode fast at the bow. But don't kill the engine just yet. Let the boat settle for a minute or two. The rode should feel solid and taut. You can even put the engine in reverse at idle for a few seconds to help set the hook firmly. Just be gentle.
A well-set anchor will feel solid against a steady, light pull. If you feel a series of jarring thumps or the rode is vibrating like crazy, that’s the classic sign of an anchor skipping along the bottom. It's not set. If that happens, you have no choice but to pull it up and start over.
It's no surprise that the market for good anchoring equipment is booming. The boat anchors market was valued at around USD 1.7 billion and is expected to climb to USD 2.5 billion by 2033. This growth is all about boaters demanding reliable gear made from tough materials like steel and aluminum that can secure their vessels safely. If you're interested in the business side, you can discover more insights about boat anchor industry growth here.
Confirming You Are Not Dragging
Okay, the anchor feels set and your scope is correct. But you're not done. The final step is to confirm you aren't dragging. Never, ever assume it's holding. Always verify.
Thankfully, there are a couple of tried-and-true ways to do this.
The old-school method is to use transit lines. Find two stationary objects on shore that line up from your vantage point—maybe a tall pine tree and a specific rock, or a telephone pole and the corner of a waterfront building. As long as those two points stay perfectly aligned, you aren't moving. If one starts to "walk" away from the other, you're dragging.
Of course, your boat's GPS is a fantastic modern tool for this. Most chartplotters have an "anchor alarm" or "anchor watch" feature. Once you're set, you turn it on. It creates a small digital circle around your boat. If your GPS position moves outside that pre-set boundary, a loud alarm goes off to wake you up.
For an even deeper dive into the whole process, our guide on how to anchor your boat for maximum security covers even more ground. Taking these final confirmation steps is what lets you relax and enjoy the anchorage, knowing you're truly secure.
Dealing with Tricky Anchoring Situations
It’d be nice if every anchorage was calm and spacious, but we all know that's rarely the case. Sooner or later, you'll find yourself dealing with a crowded harbor, a ripping current, or a forecast that has you second-guessing everything. Knowing how to handle these less-than-perfect scenarios is what separates a skipper who sleeps soundly from one who’s up all night on anchor watch.
These advanced techniques aren't about showing off. They're practical, real-world solutions that give you more security, limit your boat's movement, and can even save you from having to abandon a hopelessly stuck anchor. Mastering these skills will pay you back tenfold in safety and peace of mind.
Using Two Anchors for Better Stability and Control
A single anchor gets the job done most of the time, but there are situations where you need to bring in reinforcements. Using a second anchor gives you far more command over your boat’s position, which is a huge advantage in tight anchorages or when conditions are shifting.
Two of the most common and effective methods are the Bahamian moor and the forked moor. Each one solves a very different problem.
- The Bahamian Moor: This is your best friend when anchoring in a narrow channel with a reversing tidal current. You start by setting one anchor upstream into the current. Then, you let the tide carry you back and set a second anchor downstream. Your boat will now pivot neatly between the two anchors as the tide changes, keeping you safely centered in the channel instead of swinging all over the place.
- The Forked Moor: When you need to reduce your swing room in a packed anchorage, this is the technique to use. The idea is to set two anchors off the bow at roughly a 45 to 60-degree angle to each other. This creates a strong "V" that dramatically limits how much your boat can wander, keeping you well clear of your neighbors.
Rigging a Trip Line to Free a Fouled Anchor
There’s a unique kind of dread that comes with realizing your anchor is stuck fast on a rock or some unseen wreck. It feels like an immovable object. Before you even think about cutting your rode and losing expensive gear, you should know about the trip line.
A trip line is just a separate, lighter line that you attach to the crown of your anchor (the end opposite the flukes). The other end of this line is tied to a small float or buoy. If your anchor gets snagged, you just motor forward, grab the buoy, and pull. This yanks the anchor out backward, freeing it from whatever it was caught on. It’s an incredibly simple trick that can prevent a massive headache.
Get in the habit of rigging a trip line whenever you anchor in areas marked with "R" for rock or "Co" for coral on your charts. It takes two minutes and can save you from losing hundreds, if not thousands, of dollars in ground tackle.
Anchoring in Heavy Wind and Strong Current
When the wind starts howling or the current is really moving, the load on your anchor system increases exponentially. This is when standard procedure just isn't enough. Your first move should always be to increase your scope. While 7:1 is a good all-around ratio, don't hesitate to pay out to 10:1 or even more. This gives you a much better, more horizontal pull on the anchor, which is exactly what you need for it to hold firm.
In these conditions, an all-chain rode can be brutal. With every big gust or wave, the chain will snatch tight with a jolt that you can feel and hear throughout the boat. That's where a snubber or bridle becomes absolutely essential.
A snubber is simply a length of stretchy nylon rope that you attach to your anchor chain and lead back to a bow cleat. It acts as a shock absorber, introducing elasticity that soaks up the jarring loads from wind and waves. Not only does this make life onboard much quieter and more comfortable, but it also saves your windlass and bow roller from damaging stress. If you're serious about anchoring securely, a snubber isn't optional—it's a must-have.
Trouble-Free Anchor Retrieval Techniques
Weighing anchor should be a smooth, drama-free operation, not a wrestling match. The secret to effortless anchor retrieval isn't brute strength—it's using your boat's engine to do the heavy lifting, not your back or an overworked windlass. The whole process should be calm and methodical, built on clear communication between the person at the helm and the person on the bow.
Your goal is to motor slowly to the anchor. As the skipper gently nudges the boat forward, the crew member up front simply takes in the slack on the rode. There should be almost no strain on the line or chain. If the line suddenly goes taut, you're pulling the boat with the windlass, which is a fantastic way to burn out its motor. A quick signal to the helm to motor forward a bit more will create the slack you need.
The "Up and Down" Moment
As you motor ahead, the crew at the bow needs to be the helm's eyes. They should call out the direction of the rode. For instance, they might point and shout, "The chain is off to port, about 10 o'clock!" This kind of real-time feedback helps the skipper steer directly over the anchor.
You're aiming for that perfect moment when the rode is completely vertical in the water. In sailor's terms, this is called being "up and down." When you're directly over your anchor, and only then, should you use the boat's momentum or the windlass to break it free from the seabed. Often, a slight forward nudge from the engine is all it takes to pop it loose.
Once the anchor breaks free, you'll feel it immediately. The strain on the rode vanishes. Now, the rest of the job is simply lifting the dead weight of the anchor and rode, which is exactly what your windlass is designed to handle. This technique saves a ton of wear and tear on your gear and makes the whole process much safer.
Keeping the Deck Clean
As your anchor and chain emerge from the deep, they'll likely bring some of the bottom with them—mud, clay, or weeds. Letting this gunk onto your deck creates a nasty, slippery hazard. A little prep work here makes all the difference.
The best solution is a deck washdown hose. As the chain comes over the bow roller, give it a good blast with high-pressure water to knock off the grime before it ever touches your boat. No washdown pump? No problem. A simple bucket of seawater and a stiff-bristled brush work nearly as well.
Handling a Truly Stuck Anchor
Every so often, an anchor gets hopelessly fouled on a rock or some other underwater snag. It’s frustrating, but don't panic. Trying to muscle it out with your engine is a fast track to a broken rode or damaged deck hardware.
Instead, try a calm, methodical approach:
- Change the Angle: First, secure the rode to a cleat. Then, try motoring slowly in a wide circle around where you think the anchor is. Pulling from a completely different direction is often all it takes to dislodge it.
- Use the Tide: If the tide is rising, you can sometimes snub the rode up tight and let mother nature do the work. As the water level rises, the boat's natural buoyancy creates a steady, powerful upward pull that can free a stubborn anchor.
- The Trip Line Method: This is your get-out-of-jail-free card. As we discuss in our advanced techniques, a pre-rigged trip line lets you pull the anchor out backward. If you didn't set one, it's a lesson learned for next time, especially in rocky areas or over challenging bottoms like sandbars. For more on that specific scenario, check out our guide with 8 tips for anchoring on a sandbar.
If all else fails, you might have to consider diving on the anchor to free it by hand, but this should only be attempted if you are trained, properly equipped, and conditions are completely safe.
Common Anchoring Questions Answered
No matter how much you read, questions always come up when you’re actually out on the water, trying to get the hook down. Here are some quick-fire answers to the questions I hear most often from fellow boaters. Think of it as your on-the-fly troubleshooting guide.
What if I Can't Tell What the Seabed Is?
It happens. You pull into a new cove, the chart is a bit vague, and you're left guessing what's on the bottom. When you're flying blind without clear chart markings (like S for sand or M for mud), your best move is to rely on an anchor built for versatility.
I'd reach for a new-generation scoop-style anchor, like a Rocna or Mantus. They're engineered to dig in and hold fast across a huge range of seabeds. A classic plow anchor is another solid all-around choice. These designs are far more forgiving than a Danforth or fluke-style anchor, which really needs soft sand or mud to perform well.
Can I Just Anchor from the Stern?
Absolutely not. Let me be clear: never anchor a boat from the stern alone. This is one of the most dangerous things you can do, especially if there's any wind or current to speak of.
Boats are designed to take waves and wind on the bow, their strongest and most hydrodynamic point. When you anchor from the stern, the boat sits exposed and unstable. A decent wave can easily swamp a low transom, and in rough conditions, this could lead to taking on a catastrophic amount of water. It's one of the most critical safety rules in boating.
How Much Scope Is Really Enough?
While the 7:1 ratio is the gold standard for a good night's sleep, you don't always need to pay out that much rode. The right scope is all about the conditions you're in.
- Calm Lunch Hook: Just stopping for a quick bite in a protected spot? A 3:1 or 4:1 scope will usually do the trick.
- Moderate Conditions: For a standard daytime anchorage with a bit of a breeze, 5:1 is a reliable go-to.
- Overnight or Strong Winds: When you're settling in for the night or the wind starts to pipe up, 7:1 is your minimum for safety. If a real blow is coming through, don't think twice about going to 10:1 or even more.
A critical mistake is forgetting to account for your boat's height. Scope is calculated from your bow roller down to the seabed, not just from the waterline. In 20 feet of water with a 5-foot freeboard, a 7:1 scope means letting out (20 + 5) x 7 = 175 feet of rode.
What Is an Anchor Snubber and Do I Need One?
Think of an anchor snubber as a shock absorber for your ground tackle. It's a short length of stretchy nylon line that connects your anchor chain to a bow cleat. You typically attach it to the chain using a special chain hook or a rolling hitch knot.
If you have an all-chain rode, then yes, a snubber is absolutely essential. Chain has zero give. Every gust of wind or passing boat wake sends a jarring jolt straight to your boat, putting immense strain on your bow roller, windlass, and cleats. A snubber smooths out those shock loads, making for a quieter, more comfortable night and protecting your gear from unnecessary wear and tear.
At Boating Articles, our passion is helping you master every aspect of life on the water. For more expert guides and in-depth reviews to make your boating safer and more enjoyable, check out our full collection of articles.